I played this Op14 scenario over a year ago, and it proved quite nail biting. We did a number of things wrong when we played it, so it was good to give it another go.
The excuse was my monthly boardgame day with Gary. Op14 isn't a board game, but it looks a bit like one, and it shows how toy soldiers can solve some of the issues you can get with the traditional hex game.

I'd sent Gary the rules before hand and also a map with force deployments. The rules are a bit different for anyone brought up on SPI. There's an earlier version over in the downloads area if you want to see what I mean, although we were actually playing a more recent beta test set.
So this battle is sort of first/second day of the Marne. The day before, the 5th of September 1914, things had gone off a bit half cocked. Even so, the right hand end of von Kluck's army is still up in the air and if the French can seize the Trocy & Etavigny plateaus they can turn the line and roll up the German Army. The means to do this, of course, is a frontal assault up a hill against forces of roughly equal size.
What could possibly go wrong?
Gary took the Germans and I took the French, so we'll find out.

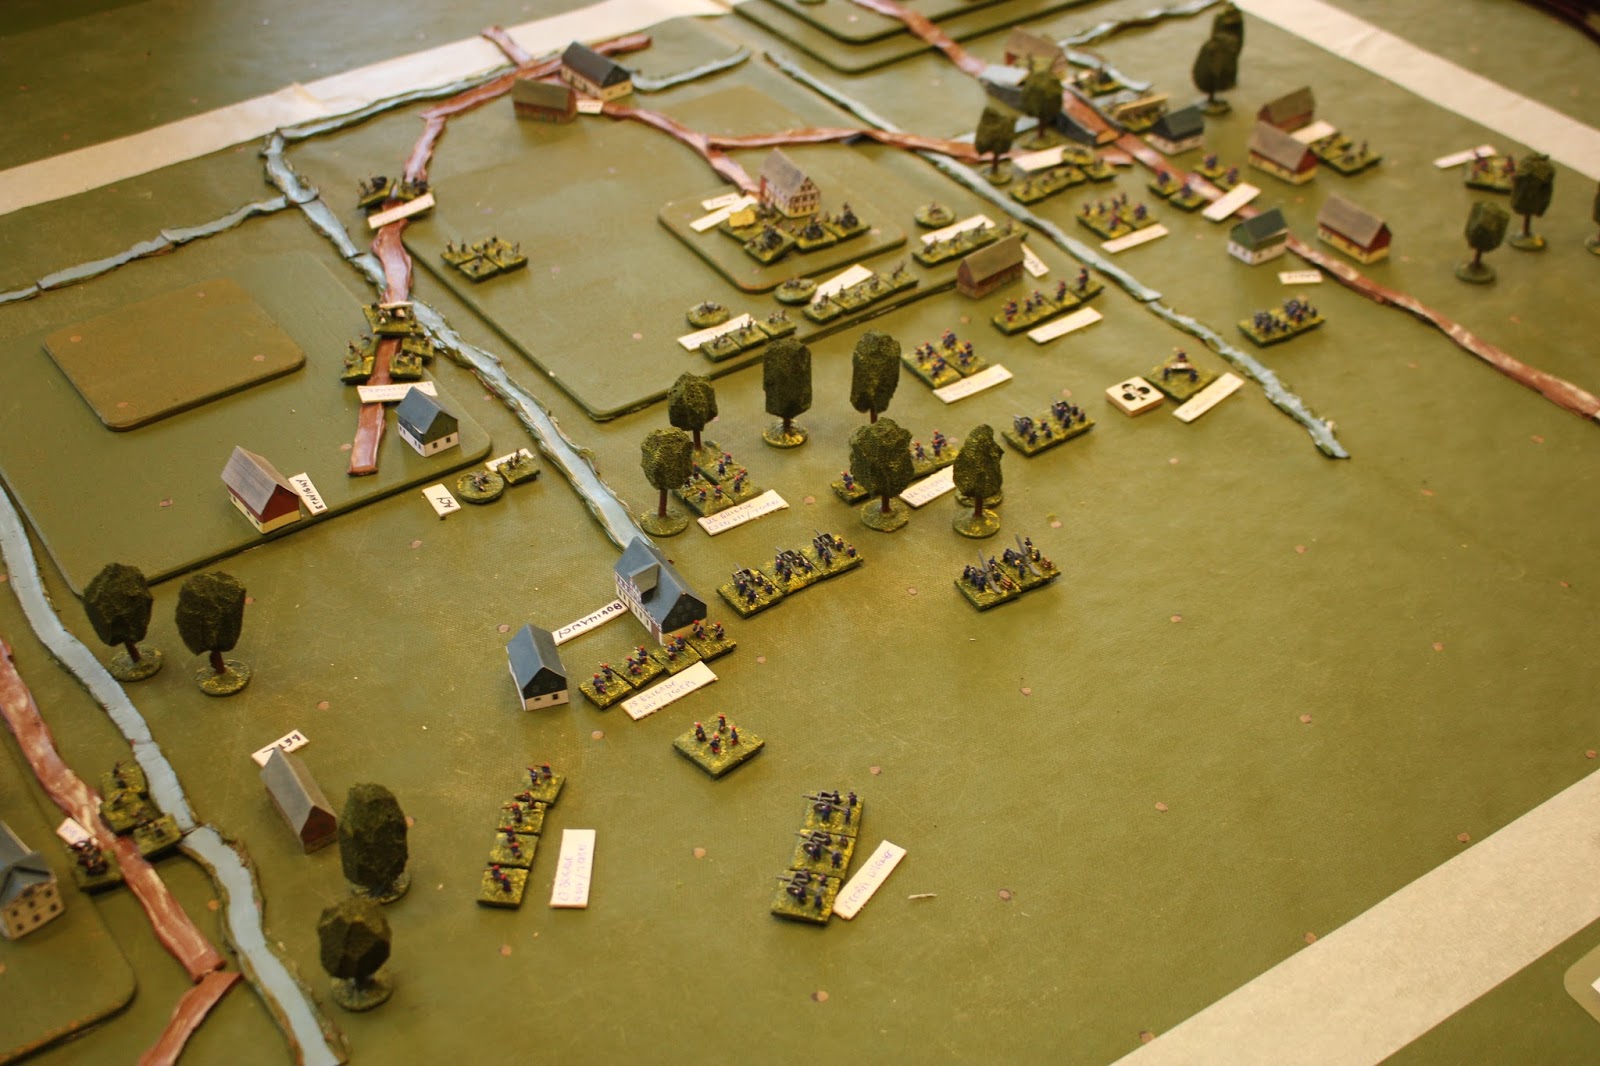
Here we see 63rd Reserve Division and some of the 14th Div on their left, approaching the plateau, complete with masses of artillery.

On my right the Germans are bringing up 3rd Division, half of II Armeekorps, to bolster their left and hold the important bridge at Germingny. It is early in the day, and we're all rushing forwards to take the important towns and villages. The Germans of 3rd Division are already across the river and are moving forward in column to take the villages closer to my start line. The left hand end of their 22 Reserve Division was already deployed in line this side of the bridge overnight. The next turn will prove crucial as to who can get their attacks in before their opponents are fully ready.

On my left I've been forced to deploy by a German Cavalry division, which has now retired back across the river in the bottom left corner and dismounted. This is slowing my enveloping wing whilst the other half of II Armeekorps bundles down the road to plug the gap.

My Moroccans get to move early in the turn and are able to attack the Germans before they can deploy. I am able to bundle them out in some disorder, as is also the case with the unit to the immediate left.

In the centre it is less good. The Germans have the drop on me and have deployed their MGs and dug in.

Back on my right the Germans are going backwards, mostly. My attempt to push back everywhere has failed with the deployed unit, however, and I take 25% casualties. The problem for me now is that I've forced the Germans back to the best defensive lines, and they've now got field guns to bolster their line. They've got howitzers on the hill, and there are no river crossings in front of my Moroccans. I'll push the Huns back again and will wipe out a German brigade but I won't be able to exploit this position.

Now my left has stalled as the Uhlans have saddled up and are now trying to get into my rear. That means the German 4th Division of II Armeekorps has won the race to the edge of the plateau. In the middle, however, my Soixante Quinzes are doing a good number on the infantry deployed on the forward slope. Alas the whizz-bangs are keeping me pinned in the woods, so I can't exploit my good shooting.

So I've pushed the Germans back again at Germingny Bridge, but the prospect of crossing it is quite daunting.

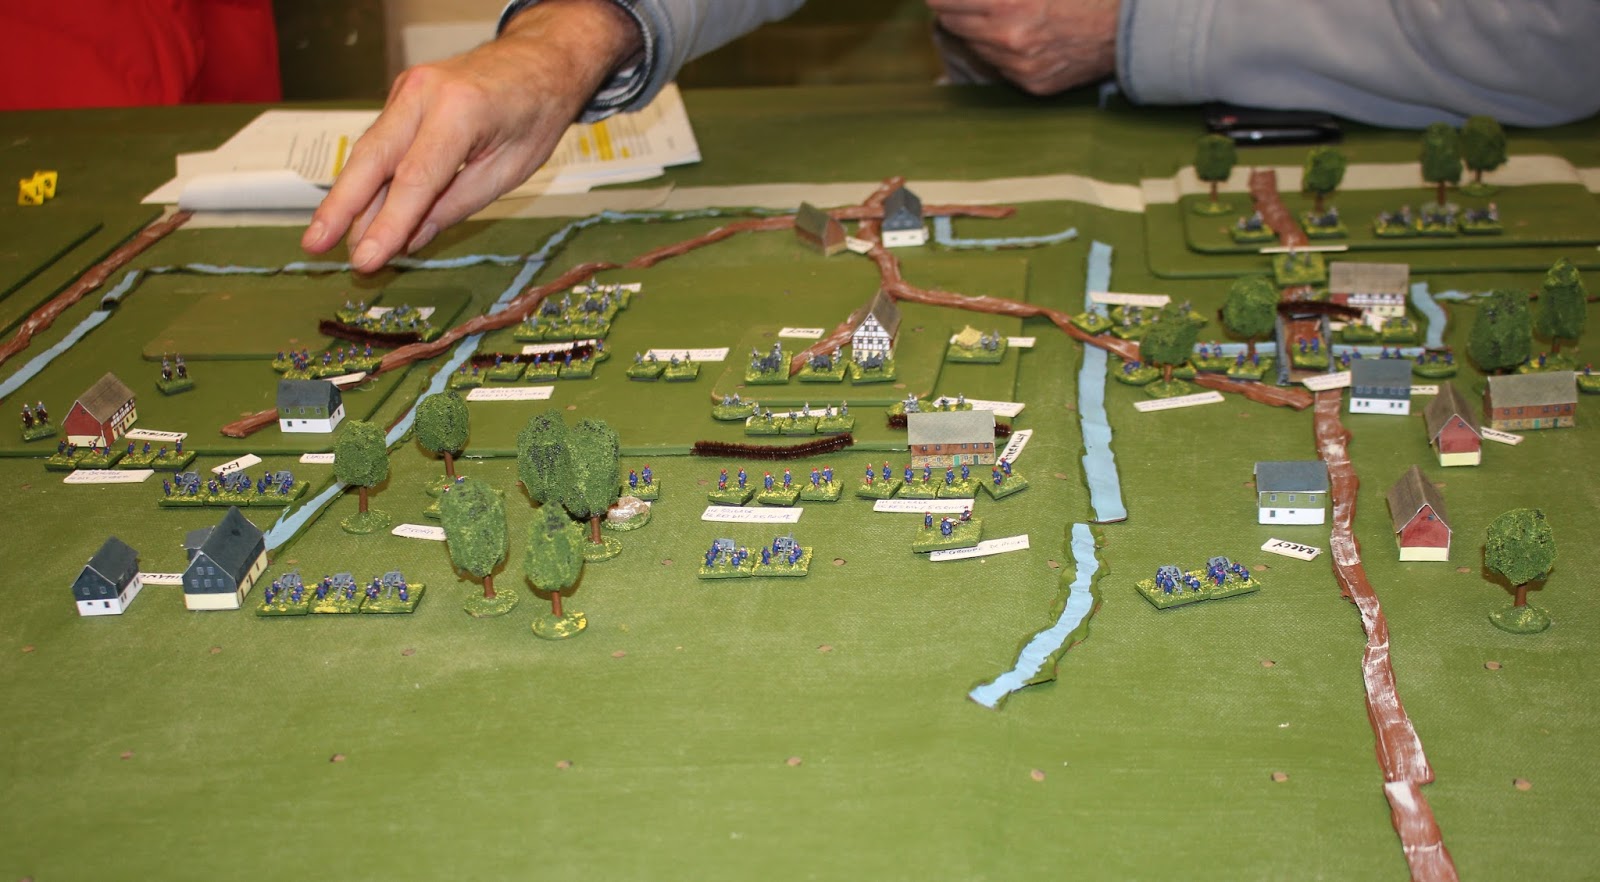
Then I am able to exploit a bit of German tardiness and I get a brigade up on the Northern end of Trocy plateau (where the yellow dice are). My gunners have also inflicted massive casualties on the ridge defenders, with one brigade reduced to a single battalion (one base).

The Uhlans are taking their time, but they are working their way round my flank guard. I can't call off the attack to secure my rear. "En avant! Toujours en avant!".

Tomthe left of the central river I'm able to drive the Germans out of Acy village at bayonet point. I now have foot hold on both plateaus!

I'm afraid things aren't looking too good for my howitzer battery however.

Yes, I'm making good, solid progress all along the ridge line. My only worry is that I'll run out of daylight.

On my right the Germans have retired behind the river. That playing card you can see means that the 3rd Division is on the point of exhaustion. I only need to inflict another casualty and they're bound to fail the test and fall apart. The high value tile here means that I move late in the turn, so unfortunately for me Gary is able to bring up and deploy some guns to strengthen his line .

Final turn and at last I'm in a position to attack Etrepilly. I've been shelling it with three batteries for several turns, and there's four hit markers on them. As my brave Frenchies storm into their position at least half of them turn into actual casualties, meaning Gary has a very slim chance of holding on. As it turns out neither of us can get a hit and I'm left at the bottom of the hill as night draws in.

This is where it ends. I've got a decent salient on the left hand end of my line. I've lost my howitzers, but the Uhlans are now a spent force. The centre of the German line is very weak, but I just ran out of time to exploit it. Gary is pointing to where he is explaining how he is going to put everything right.
Compared with history I think I did a little bit better, but not as well as I thought I would do at one point. It is a surprisingly well balanced scenario for one just plucked out of the pages of a book, and there's a lot to think about. There are no light weight decisions in the game.
Gary really enjoyed it, and is coming round to the idea that toy soldiers might be alright. So, a definite win, I should say.
The excuse was my monthly boardgame day with Gary. Op14 isn't a board game, but it looks a bit like one, and it shows how toy soldiers can solve some of the issues you can get with the traditional hex game.

I'd sent Gary the rules before hand and also a map with force deployments. The rules are a bit different for anyone brought up on SPI. There's an earlier version over in the downloads area if you want to see what I mean, although we were actually playing a more recent beta test set.
So this battle is sort of first/second day of the Marne. The day before, the 5th of September 1914, things had gone off a bit half cocked. Even so, the right hand end of von Kluck's army is still up in the air and if the French can seize the Trocy & Etavigny plateaus they can turn the line and roll up the German Army. The means to do this, of course, is a frontal assault up a hill against forces of roughly equal size.
What could possibly go wrong?
Gary took the Germans and I took the French, so we'll find out.


On my right the Germans are bringing up 3rd Division, half of II Armeekorps, to bolster their left and hold the important bridge at Germingny. It is early in the day, and we're all rushing forwards to take the important towns and villages. The Germans of 3rd Division are already across the river and are moving forward in column to take the villages closer to my start line. The left hand end of their 22 Reserve Division was already deployed in line this side of the bridge overnight. The next turn will prove crucial as to who can get their attacks in before their opponents are fully ready.
On my left I've been forced to deploy by a German Cavalry division, which has now retired back across the river in the bottom left corner and dismounted. This is slowing my enveloping wing whilst the other half of II Armeekorps bundles down the road to plug the gap.

My Moroccans get to move early in the turn and are able to attack the Germans before they can deploy. I am able to bundle them out in some disorder, as is also the case with the unit to the immediate left.

In the centre it is less good. The Germans have the drop on me and have deployed their MGs and dug in.

Back on my right the Germans are going backwards, mostly. My attempt to push back everywhere has failed with the deployed unit, however, and I take 25% casualties. The problem for me now is that I've forced the Germans back to the best defensive lines, and they've now got field guns to bolster their line. They've got howitzers on the hill, and there are no river crossings in front of my Moroccans. I'll push the Huns back again and will wipe out a German brigade but I won't be able to exploit this position.

Now my left has stalled as the Uhlans have saddled up and are now trying to get into my rear. That means the German 4th Division of II Armeekorps has won the race to the edge of the plateau. In the middle, however, my Soixante Quinzes are doing a good number on the infantry deployed on the forward slope. Alas the whizz-bangs are keeping me pinned in the woods, so I can't exploit my good shooting.

So I've pushed the Germans back again at Germingny Bridge, but the prospect of crossing it is quite daunting.

Then I am able to exploit a bit of German tardiness and I get a brigade up on the Northern end of Trocy plateau (where the yellow dice are). My gunners have also inflicted massive casualties on the ridge defenders, with one brigade reduced to a single battalion (one base).

The Uhlans are taking their time, but they are working their way round my flank guard. I can't call off the attack to secure my rear. "En avant! Toujours en avant!".

Tomthe left of the central river I'm able to drive the Germans out of Acy village at bayonet point. I now have foot hold on both plateaus!

I'm afraid things aren't looking too good for my howitzer battery however.

Yes, I'm making good, solid progress all along the ridge line. My only worry is that I'll run out of daylight.

On my right the Germans have retired behind the river. That playing card you can see means that the 3rd Division is on the point of exhaustion. I only need to inflict another casualty and they're bound to fail the test and fall apart. The high value tile here means that I move late in the turn, so unfortunately for me Gary is able to bring up and deploy some guns to strengthen his line .

Final turn and at last I'm in a position to attack Etrepilly. I've been shelling it with three batteries for several turns, and there's four hit markers on them. As my brave Frenchies storm into their position at least half of them turn into actual casualties, meaning Gary has a very slim chance of holding on. As it turns out neither of us can get a hit and I'm left at the bottom of the hill as night draws in.
Compared with history I think I did a little bit better, but not as well as I thought I would do at one point. It is a surprisingly well balanced scenario for one just plucked out of the pages of a book, and there's a lot to think about. There are no light weight decisions in the game.
Gary really enjoyed it, and is coming round to the idea that toy soldiers might be alright. So, a definite win, I should say.
A most interesting scenario - very enjoyable. Are your 6mm WW1 French and German troops by Baccus? Cheers. KEV.
ReplyDeleteYes. They are indeed Mr Peter Berry's finest miniature creations. The artillery pieces are particularly good.
DeleteThanks for confirmation. Yes, I will definitely have a closer look at the Baccus 6mm Website- the WW1 troops you have painted and presented look excellent- well done.
DeleteThey are so easy to do. If you buy 1914 French it'll make Peter smile as mostly us Brits just buy BEF, which is sort of wrong for 1914.
DeleteI was looking at doing some Marne games. Where did you find the scenario?
ReplyDeleteI got it out of Ian Senior's "Home before the leaves fall". The map is on p226 of the hardback version.
DeleteGreat game! I do early 1914 French-Germans too only using Kallistra 10mm. Your guys look really good.
ReplyDeleteThe Frenchies almost pulled it off, too bad.
I do have one question:
I always thought the French didn't have howitzers those first battles. Was that in Senior's book? Interesting.
I enjoyed reading your Eastern front game some time back too using this system.
They had a few howitzers at Corps level. It's in Senior's book and Haythornthwaite's source book, I think.
DeleteAlso referenced in the Osprey. You need the delightfully daft looking Rimhailho.
DeleteTrebian,
ReplyDeleteYou made go and but the book (a real bargain from AbeBooks)
You mention a more recent version of the rules? I've got the original Nugget version (and yours) and Tim Gow's conversion to hexes - are th more recent rules available anywhere?
Bill
Have a look top right on this page. I think there's a download.
Delete