So, the big Bank Holiday Bash took place as promised. Heraclea is Pyrrhus' first battle in Italy. Fought in 280BC this is a battle for which there is little evidence but a great historical legacy.
For this refight I was joined by Phil, Chris (but not one of the more usual ones) and Richard (but not the usual one either). I partnered Chris with the Romans, and Phil took Pyrrhus with Richard. As we ended up facing each other over the table I was fighting Richard (who happens to be my big brother) and Phil was fighting Chris (who is his normal Doubles partner). So, no particularly important bragging rights on the table then.
As I was also umpiring the game I was very much the junior Roman consul.
The set up, as in the previous blog posting, is taken from Strategos II. Phil Sabin doesn't give any deployment guidance in SII so I decided to make the Romans cross the river and have Pyrrhus react from his camp. I probably didn't get this completely right.
The Romans opened the game by surging across the river, surprising the Pyrrhic outlying forces.
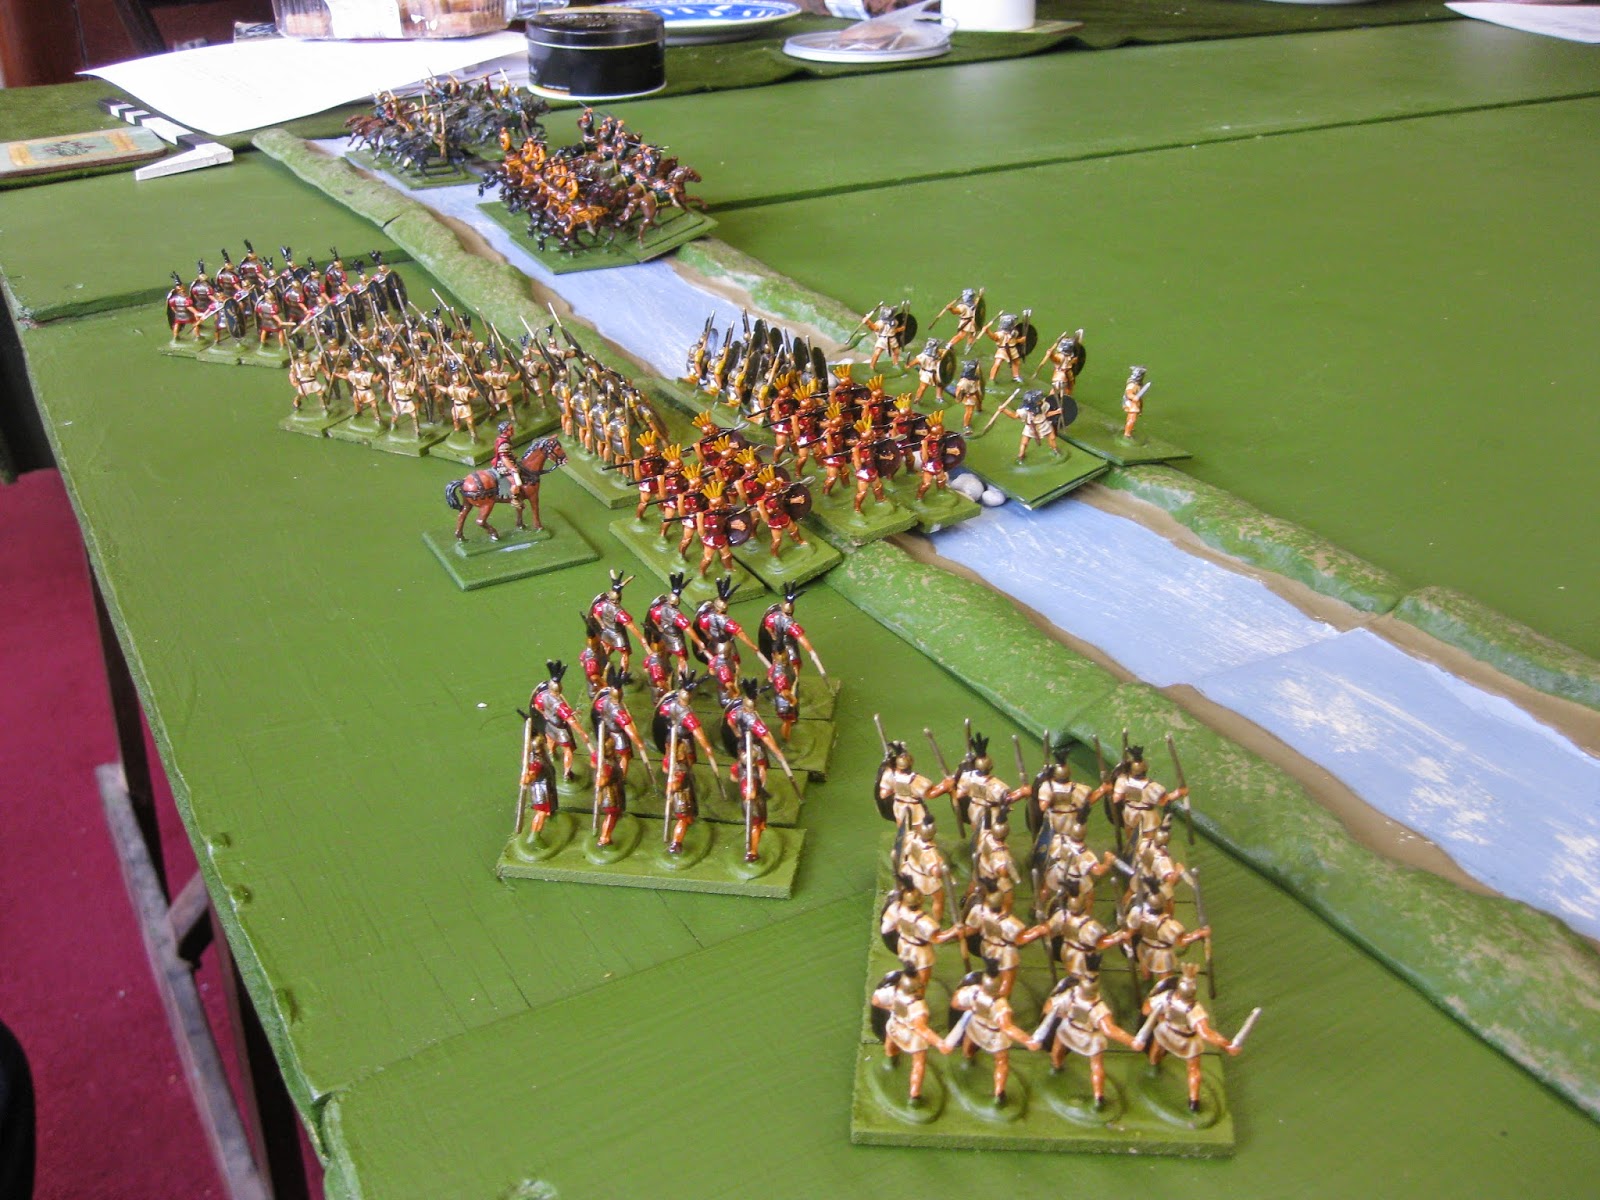
The foot had to cross at the fords so there was much wheeling to get into position. I introduced a march column rule for the deployment game, allowing a 12cm move with unrestricted wheeling to both sides. This was a one way deal, - once you deployed to line you couldn't go back. Any troops caught in a march column only get 1d6 per two bases in combat.
Cavalry could cross the river anywhere, subject to each base having to roll more than 1 on a d6.
The Epirots surged out of their camp.They were permitted to exit a unit per wall section, and made the most of it.

Phil, playing Pyrrhus, entrusted my brother with the elephants to give him a leg up against me. I think this may have been a mistake as Richard didn't get as much mileage out of them as he probably should have done. I'd introduced an elephant fear rule for the Roman cavalry, requiring them to take a morale test for every turn they are within 24cm of the elephant unit, but it only got used once in the game.

With our light infantry across the ford and driving back the Greek lights I pushed two columns across the ford side by side.

Chris, on our left, was doing the same.

It soon became clear there were a lot of pikemen on their side of the table.

As you might expect the "roll more than a 1 to cross the river" hit me as soon as I tried to get my chaps up and out.

I opted to wait another turn for the straggling cavalry to catch up. This gave the Greeks a fair amount of breathing room to get their pikes into battle formation.

Especially as I followed up with another 1 the next turn.

We were stumbling across the river slowly, and it was obvious that the Greeks were forming up more rapidly that we were, and there was a small danger we might get pinned back against the river. My central cavalry unit had already suffered some damage from Phil's light horse, and I was a base down before I realised what was going on. Still I needed to get some troops across the board to make the Greeks pause whilst we sorted ourselves out.
BTW Some of our cavalry isn't as Roman as it might be. With a massive 5 cavalry units in Sabin's Roman set up, my troop box soon ran dry, and Gauls and Successors were pressed into action.

Chris on his flank has extracted his cavalry from the water and is lining his legionaries up in some type of formation. We clearly have a big hole in the middle of our army which we need to fill, and it is taking ages to get the infantry across the ford.

I omitted to take any photos for about 20 minutes (Phil may be able to fill the gap over on his Ancients on the Move blog) so in the next picture things have moved on apace.
I've lost my central heavy cavalry unit, - combination of many factors, mostly javelins and arrows. My legions have shaken out into line, and I've managed to draw Richard's veteran cavalry forward and put them in a trap and got a flank assault by a unit of legionaries. This looks brilliant, but in practice they were not tremendously effective, taking too long to grind their opponents down. The elephant is bearing down on some of my legionaries, but I reckoned I could get two on to one at some point.

At the Phil/Chris end of the table Chris has engineered a position where he is facing off the Pyrrhic cavalry with a heavy cavalry/infantry combo, whilst he lines up against the phalanx. He's doing pretty well here, as the odds are actually against him. Of course, in AMW the odds count for nothing.

Here's a close up of Phil extracting his light horse from between the two infantry lines.

On the Phil/Chris wing the legions and the phalanx collide.This is always a worrying moment for the Romans. the phalanxes are hitting on 3+, not 4, and we tweak the rules so they have to lose two bases before they lose cohesion.

Another gap in the photo record, this time of 15 minutes or so. Richard and I have both lost a cavalry unit, and he has extracted his remnants before my infantry can get at them.

The elephant, having had a destructive first round killing a base and routing another in exchange for no damage then declined in effectiveness, failing to kill the unit in front of it before expiring. This was a big win for me, as I reckon an elephant is always good for at least 1 1/2 unit kills. You can see the gap where it was in the picture below. It even routed directly backwards, hitting nothing else.

Phil had a bit of a nightmare with his phalanx, not capitalising on his 3+ hit score and failing morale rolls. He was forced, as Pyrrhus, to lead his companions head long into the front of a unit of legionaries, whilst holding off two Roman cavalry units with his other.

(BTW we have removed the fort at this point to save it from getting damaged).
My central legionaries are taking a real hammering, but Phil is doing worse against Chris.

Our wing is fragmenting badly, with things going hither and thither.

Meanwhile, Pyrrhus is playing a blinder. His ability to re-roll dice selectively made a significant difference. Alas he was killed in this melee only for it be revealed that it wasn't Pyrrhus at all! He'd swapped clothes with his side kick earlier on to avoid this precise problem (historically true, so I was quite glad this actually happened) and popped up as the command figure my brother had been pushing around. My how we laughed!

On my flank our remaining cavalry finally faced off, lead by our respective commanders. Of course, I'm now fighting Pyrrhus, which made things more difficult.

In the middle we've made a pretty good mess of Phil & Richard's main phalanx, and we're starting to get near to the army breakpoint on both sides.

Phil then throws his light horse into the back of my cavalry who expire and are removed.

And that's about it. Chris claimed I miscounted, but we were at break point and failed our "to stand" roll, so victory to the Greeks, but with very heavy losses.
Time for me to light the barbecue.
It was a close fought, tight, game that hung in the balance for pretty much its entire length. The march up and deploy meant the Romans never got set up in classical formation, which was probably a mistake, but the game just about worked despite that. The Generals proved to be important wherever they were used, but I think the mishandling of the elephant meant that the Romans were in with a chance for longer than probably they should have been.
The game took about 4 1/2 hours, with breaks for drinks, so not a bad afternoon's entertainment.
For this refight I was joined by Phil, Chris (but not one of the more usual ones) and Richard (but not the usual one either). I partnered Chris with the Romans, and Phil took Pyrrhus with Richard. As we ended up facing each other over the table I was fighting Richard (who happens to be my big brother) and Phil was fighting Chris (who is his normal Doubles partner). So, no particularly important bragging rights on the table then.
As I was also umpiring the game I was very much the junior Roman consul.
The set up, as in the previous blog posting, is taken from Strategos II. Phil Sabin doesn't give any deployment guidance in SII so I decided to make the Romans cross the river and have Pyrrhus react from his camp. I probably didn't get this completely right.
The Romans opened the game by surging across the river, surprising the Pyrrhic outlying forces.
The foot had to cross at the fords so there was much wheeling to get into position. I introduced a march column rule for the deployment game, allowing a 12cm move with unrestricted wheeling to both sides. This was a one way deal, - once you deployed to line you couldn't go back. Any troops caught in a march column only get 1d6 per two bases in combat.
Cavalry could cross the river anywhere, subject to each base having to roll more than 1 on a d6.
The Epirots surged out of their camp.They were permitted to exit a unit per wall section, and made the most of it.
Phil, playing Pyrrhus, entrusted my brother with the elephants to give him a leg up against me. I think this may have been a mistake as Richard didn't get as much mileage out of them as he probably should have done. I'd introduced an elephant fear rule for the Roman cavalry, requiring them to take a morale test for every turn they are within 24cm of the elephant unit, but it only got used once in the game.
With our light infantry across the ford and driving back the Greek lights I pushed two columns across the ford side by side.
Chris, on our left, was doing the same.
It soon became clear there were a lot of pikemen on their side of the table.
As you might expect the "roll more than a 1 to cross the river" hit me as soon as I tried to get my chaps up and out.
I opted to wait another turn for the straggling cavalry to catch up. This gave the Greeks a fair amount of breathing room to get their pikes into battle formation.
Especially as I followed up with another 1 the next turn.
We were stumbling across the river slowly, and it was obvious that the Greeks were forming up more rapidly that we were, and there was a small danger we might get pinned back against the river. My central cavalry unit had already suffered some damage from Phil's light horse, and I was a base down before I realised what was going on. Still I needed to get some troops across the board to make the Greeks pause whilst we sorted ourselves out.
BTW Some of our cavalry isn't as Roman as it might be. With a massive 5 cavalry units in Sabin's Roman set up, my troop box soon ran dry, and Gauls and Successors were pressed into action.
Chris on his flank has extracted his cavalry from the water and is lining his legionaries up in some type of formation. We clearly have a big hole in the middle of our army which we need to fill, and it is taking ages to get the infantry across the ford.
I omitted to take any photos for about 20 minutes (Phil may be able to fill the gap over on his Ancients on the Move blog) so in the next picture things have moved on apace.
I've lost my central heavy cavalry unit, - combination of many factors, mostly javelins and arrows. My legions have shaken out into line, and I've managed to draw Richard's veteran cavalry forward and put them in a trap and got a flank assault by a unit of legionaries. This looks brilliant, but in practice they were not tremendously effective, taking too long to grind their opponents down. The elephant is bearing down on some of my legionaries, but I reckoned I could get two on to one at some point.
At the Phil/Chris end of the table Chris has engineered a position where he is facing off the Pyrrhic cavalry with a heavy cavalry/infantry combo, whilst he lines up against the phalanx. He's doing pretty well here, as the odds are actually against him. Of course, in AMW the odds count for nothing.
Here's a close up of Phil extracting his light horse from between the two infantry lines.
On the Phil/Chris wing the legions and the phalanx collide.This is always a worrying moment for the Romans. the phalanxes are hitting on 3+, not 4, and we tweak the rules so they have to lose two bases before they lose cohesion.
Another gap in the photo record, this time of 15 minutes or so. Richard and I have both lost a cavalry unit, and he has extracted his remnants before my infantry can get at them.
The elephant, having had a destructive first round killing a base and routing another in exchange for no damage then declined in effectiveness, failing to kill the unit in front of it before expiring. This was a big win for me, as I reckon an elephant is always good for at least 1 1/2 unit kills. You can see the gap where it was in the picture below. It even routed directly backwards, hitting nothing else.
Phil had a bit of a nightmare with his phalanx, not capitalising on his 3+ hit score and failing morale rolls. He was forced, as Pyrrhus, to lead his companions head long into the front of a unit of legionaries, whilst holding off two Roman cavalry units with his other.
(BTW we have removed the fort at this point to save it from getting damaged).
My central legionaries are taking a real hammering, but Phil is doing worse against Chris.
Our wing is fragmenting badly, with things going hither and thither.
Meanwhile, Pyrrhus is playing a blinder. His ability to re-roll dice selectively made a significant difference. Alas he was killed in this melee only for it be revealed that it wasn't Pyrrhus at all! He'd swapped clothes with his side kick earlier on to avoid this precise problem (historically true, so I was quite glad this actually happened) and popped up as the command figure my brother had been pushing around. My how we laughed!
On my flank our remaining cavalry finally faced off, lead by our respective commanders. Of course, I'm now fighting Pyrrhus, which made things more difficult.
In the middle we've made a pretty good mess of Phil & Richard's main phalanx, and we're starting to get near to the army breakpoint on both sides.
Phil then throws his light horse into the back of my cavalry who expire and are removed.
And that's about it. Chris claimed I miscounted, but we were at break point and failed our "to stand" roll, so victory to the Greeks, but with very heavy losses.
Time for me to light the barbecue.
It was a close fought, tight, game that hung in the balance for pretty much its entire length. The march up and deploy meant the Romans never got set up in classical formation, which was probably a mistake, but the game just about worked despite that. The Generals proved to be important wherever they were used, but I think the mishandling of the elephant meant that the Romans were in with a chance for longer than probably they should have been.
The game took about 4 1/2 hours, with breaks for drinks, so not a bad afternoon's entertainment.
Sounds like a classic!
ReplyDeleteNot really for me to say, - but when Pyrrhus got "killed" and resurrected as actually happened it sure felt that way.
DeleteNice looking game!
ReplyDeleteThanks. You can't beat lots of toys and a big plastic fort, can you?
Delete