Another game in the occasional series of refights of English Civil War battles using "Victory Without Squares".
This week Phil & I had a go at Roundway Down (aka "Runaway Down") where William Waller's reputation was shredded and Hasilrige's Lobsters fought their last battle.
It is also the battle that created Lord Wilmot's reputation as a dashing cavalry commander and the epitome of the devil may care Cavalier.
Following the inconclusive Battle of Lansdown, Wilmot chased Waller's men down again on Roundway Down. The location of the battle isn't known exactly but generally it can be concluded that it was fought on open ground that gave neither side an advantage.
My information for this battle is taken from Richard Brooks' "Battlefields of Britain and Ireland" and the scenario published in "Battle for Wargamers" in the late 70's by Stuart Asquith. Generally I favour Brooks over Asquith for details where they are not compatible. (NB It is not clear whether Wilmot was on the left or the right of the Royalist attack. As most troop positions are based on his actions/location - eg he fights Hasilrige first - deployments in recreations of this battle can be mirror images of each other).

I put Waller's army on a slight ridge to break the table up more than anything. Wilmot's army is approaching at an angle. This is the only way I can see that Waller's guns could have been masked by his cavalry, as reported in the accounts of the action.

Phil was playing Waller, and unlike his predecessor took a more aggressive approach and decided to take the battle to the Royalists.

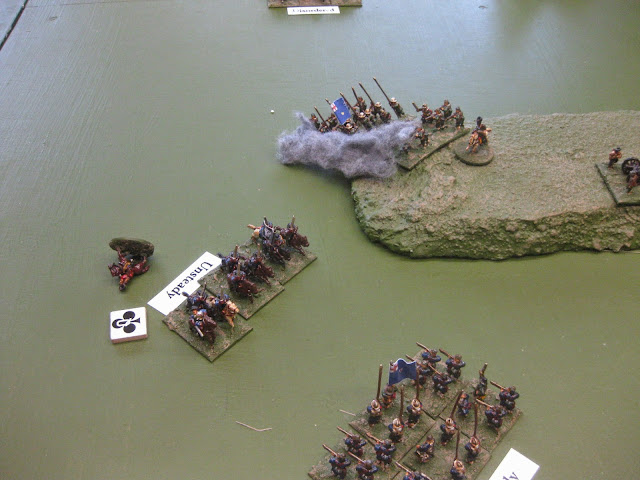
Things generally went Phil's way. His artillery succeeded in disrupting my right hand cavalry, halting them in their tracks (Disorganised cavalry may not charge). On my left, Hasilrige stood off and gave me a pistol volley, inflicting sufficient damage to even up the conflict, and driving me off, although at some cost to themselves. My inability to pin them in position meant my flanking manoeuvre didn't quite come off.

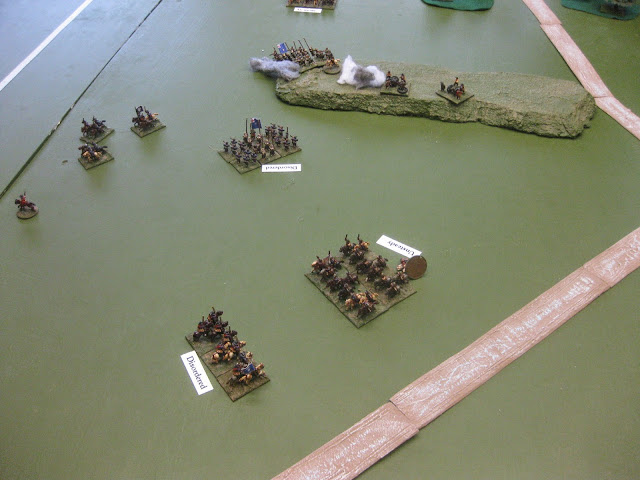
Phil is rushing his infantry across to shore up Hasilrige's wing. At the bottom Waller's horse close up and discharge their pistols.

The Lobsters bounce off another cavalry charge, but Sir Arthur is unhorsed and retires from the battle

Lord Byron on my right is having the worst of it from Waller's horse and is being steadily driven back.

Another round of combat sees both Byron and Waller severely injured and unable to carry on.

At last Wilmot breaks the Lobsters and their supports and drives them towards the rear of the battle field. His men are in poor shape however.

Outpaced by the fleeing horse Wilmot's men are exposed to a volley from the infantry and break and flee.
Another volley rakes Price Maurice's troop, and he is also injured.

At last Hopton's foot arrive, but it looks like it might be too late.
More volleys from the infantry break Maurice's horse, who also decide to retire.

Byron's horse are then bested by Waller's cavalry, and decide to leave the table too.

The Royalist foot deploy and halt Waller's advance.

On the Parliamentarian right Hasilrige's men have reformed and re-join the action, to be confronted by Maurice's rallied troops.

Hasilrige & Maurice fight an inconclusive round of combat, but it is clear by this point that the day has gone to the forces of Parliament.
As we had enough time we reset the forces and replayed the game using Advanced Armati, with Phil's ECW amendments. It was closer, but still not a victory for the Royalists.
There is a lesson in both of the refights. It isn't necessarily clear in the battle report, but the odds are stacked in favour of the Royalist cavalry. They have a better than 50% chance of breaking the Parliamentarian horse within a move or two, and a very slim chance of being driven off. The game as I envisaged it would feature a hasty cavalry action then a protracted infantry retirement fight as Waller tries to extract his foot from the shambles.
As it was I never got traction. Excellent shooting by the artillery and also a remarkably effective display of the parliamentarian cavalry tactics (ie taking the charge at the halt and discharging pistols/carbines) blunted Wilmot's hell for leather charges. Once they had failed he had nothing up his sleeve. The infantry were off the field and he had nowhere to fall back on and reform. It shows what a desperate action this was. It is described as brilliant and it was one of the most decisive victories of the war. In addition to the total destruction of the Parliamentarian horse, the infantry finally disintegrated as well.
However it clearly hangs on a knife edge. There's no battlefield tactical sophistication here. Wilmot just gallops up and charges pell-mell into the Parliamentarian Horse. If things go well for him, he's a genius, if they don't he's an idiot. The historical battle seems to prove the validity of the Royalist hard charging tactics at a troop level. If this is to be re-fought, I might need to alter the odds even more.
This week Phil & I had a go at Roundway Down (aka "Runaway Down") where William Waller's reputation was shredded and Hasilrige's Lobsters fought their last battle.
It is also the battle that created Lord Wilmot's reputation as a dashing cavalry commander and the epitome of the devil may care Cavalier.
Following the inconclusive Battle of Lansdown, Wilmot chased Waller's men down again on Roundway Down. The location of the battle isn't known exactly but generally it can be concluded that it was fought on open ground that gave neither side an advantage.
My information for this battle is taken from Richard Brooks' "Battlefields of Britain and Ireland" and the scenario published in "Battle for Wargamers" in the late 70's by Stuart Asquith. Generally I favour Brooks over Asquith for details where they are not compatible. (NB It is not clear whether Wilmot was on the left or the right of the Royalist attack. As most troop positions are based on his actions/location - eg he fights Hasilrige first - deployments in recreations of this battle can be mirror images of each other).

I put Waller's army on a slight ridge to break the table up more than anything. Wilmot's army is approaching at an angle. This is the only way I can see that Waller's guns could have been masked by his cavalry, as reported in the accounts of the action.

Phil was playing Waller, and unlike his predecessor took a more aggressive approach and decided to take the battle to the Royalists.

Things generally went Phil's way. His artillery succeeded in disrupting my right hand cavalry, halting them in their tracks (Disorganised cavalry may not charge). On my left, Hasilrige stood off and gave me a pistol volley, inflicting sufficient damage to even up the conflict, and driving me off, although at some cost to themselves. My inability to pin them in position meant my flanking manoeuvre didn't quite come off.

Phil is rushing his infantry across to shore up Hasilrige's wing. At the bottom Waller's horse close up and discharge their pistols.

The Lobsters bounce off another cavalry charge, but Sir Arthur is unhorsed and retires from the battle

Lord Byron on my right is having the worst of it from Waller's horse and is being steadily driven back.

Another round of combat sees both Byron and Waller severely injured and unable to carry on.

At last Wilmot breaks the Lobsters and their supports and drives them towards the rear of the battle field. His men are in poor shape however.

Outpaced by the fleeing horse Wilmot's men are exposed to a volley from the infantry and break and flee.

Another volley rakes Price Maurice's troop, and he is also injured.

At last Hopton's foot arrive, but it looks like it might be too late.

More volleys from the infantry break Maurice's horse, who also decide to retire.

Byron's horse are then bested by Waller's cavalry, and decide to leave the table too.

The Royalist foot deploy and halt Waller's advance.

On the Parliamentarian right Hasilrige's men have reformed and re-join the action, to be confronted by Maurice's rallied troops.

Hasilrige & Maurice fight an inconclusive round of combat, but it is clear by this point that the day has gone to the forces of Parliament.
There is a lesson in both of the refights. It isn't necessarily clear in the battle report, but the odds are stacked in favour of the Royalist cavalry. They have a better than 50% chance of breaking the Parliamentarian horse within a move or two, and a very slim chance of being driven off. The game as I envisaged it would feature a hasty cavalry action then a protracted infantry retirement fight as Waller tries to extract his foot from the shambles.
As it was I never got traction. Excellent shooting by the artillery and also a remarkably effective display of the parliamentarian cavalry tactics (ie taking the charge at the halt and discharging pistols/carbines) blunted Wilmot's hell for leather charges. Once they had failed he had nothing up his sleeve. The infantry were off the field and he had nowhere to fall back on and reform. It shows what a desperate action this was. It is described as brilliant and it was one of the most decisive victories of the war. In addition to the total destruction of the Parliamentarian horse, the infantry finally disintegrated as well.
However it clearly hangs on a knife edge. There's no battlefield tactical sophistication here. Wilmot just gallops up and charges pell-mell into the Parliamentarian Horse. If things go well for him, he's a genius, if they don't he's an idiot. The historical battle seems to prove the validity of the Royalist hard charging tactics at a troop level. If this is to be re-fought, I might need to alter the odds even more.
I did a re-fight of this battle as part of my ECW campaign set in Wiltshire. The game hung on an edge and the Royalists won - at one stage I thought Parlianment would win, have a look at.
ReplyDeletehttp://cavalierecw.blogspot.co.uk/2012/02/roundway-down-thu-13th-july-1643-forces.html
http://cavalierecw.blogspot.co.uk/2012/02/battle-of-roundway-down.html
a battle which could go either way
An exciting write up. It's a battle that can go either way, rather in the same way that a penny can come down heads or tails.
Delete