I love the look of early aircraft. The string, the open cockpits, the propellers. The flowing scarfs. Knights of the Air and all that. The pre-carpet bombing and blitzkrieg innocence (which is nonsense of course, but, y'know).
I needed some aircraft for my RCW project. I was thinking of getting more Tumbling Dice mini-planes, but as I already have a few 1/144th Skytrex models already, I thought why not add to them?
Well...of course I'd forgotten how damn fiddly the wretched things are. I ordered in a couple of RE 8s, a pair of Nieuport 17s and an extra Sopwith Camel from Red Eagle Miniatures who now stock the Skytrex range, after rooting around and not finding any alternative.
The instructions on assembly are quite clear. Some of the struts are a bit ill-formed (at least to me) and I replaced a number of then on the Nieuport with plastic rod. What I'd forgotten was how much of a nightmare it is putting them together, and getting the bits all lined up.
I started with the RE 8, and cleaned out all the locating holes with variously a knife and pin drill. Then I put the struts in the lower wing, and super glued them in place. Once I'd got them all lined up, I was able to do a dry fit on the upper wing to ensure I'd got them right. The cockpit wing support struts were a bit more awkward, but I got them in eventually.
Once it was all set I was able to file down where the locating pins of the struts stuck through the wings, and fit the rear gunner. I'd had an issue with the locating pin for the propeller, so I had to glue that flush. Once it was all finished and set, I started with the fresh hell that was the under carriage. Would it glue? Would it b*gg*ry. Eventually I left it all balanced precariously in place, dropped some super glue on the points where it touched, and then left it to set overnight. It took me about three days to get it fully assembled and stuck, as I had to leave it frequently to set, and then find bits had dropped off.
Then came the painting. I should probably drilled a hole in the underside and stuck in a wire pole to hold it whilst I daubed the colours on. In the end I went for holding the tail, then painting the tail when everything else had dried. I'm really rubbish at this stuff.
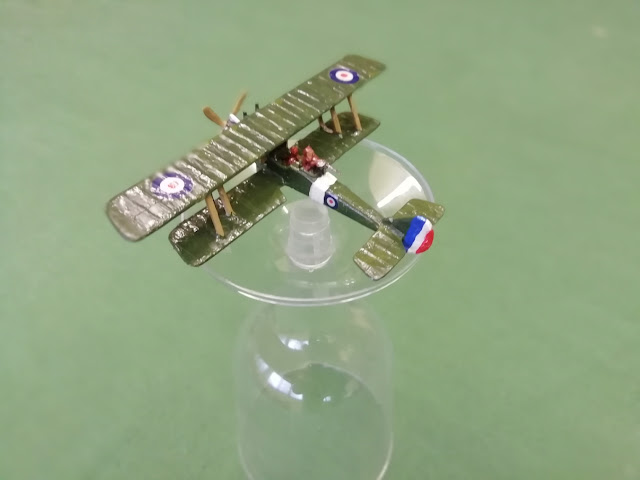


Yikes! A lot of trial and error on these birds. The results look good to me and from gaming distance, no one will ever know. Had you not said anything, no one would have been the wiser. Rather than send comments on a postcard, here in the states we would say, "write your comments on a $20 dollar bill and send it in."
ReplyDelete"Answers on a postcard to..." was a regular refrain on the Breakfast show on Wonderful Radio 1 during the 1970s. Nothing as vulgar as asking for money by the BBC.
DeleteI think they look okay. I'm certainly not redoing them. But I won't be buying anymore until I forget this experience.
I salute your determination! I lost the will to live, trying to build 1/144 scale resin aircraft for the Russo-Polish War but my brother directed me to 3D printed models which are light, robust and paint nicely. I ended up with a Nieuport, Fokker DVII and a couple of two-seaters which was quite enough for our Warsaw 1920 game a few years ago.
ReplyDeleteThese are metal, which work okay once you have superglue that sticks. At least you can bend them into shape. I had a look for 3d printed models but couldn't find what I wanted at the price I wanted to pay. Nigel's Google-Fu is awesome when tracking down odd wargaming kit.
DeleteValom are producing 1:144 WW1 aircraft. No Nieuports as far as I know. Plastic injection kits, 2 to a box.
ReplyDeleteFor WW1 1:144 I don't think you can beat Mamoli; these were a short run of metal kits produced in Italy, lovely kits. Stock seems to have ended up in the USA.
Reverisco aren't bad, but again across the pond which makes postage expensive.
Red Star are probably the cheapest alternative in the UK.
Neil
Valom are a new name to me, and didn't come up on my searches. I've since had a look, and they're ever so slightly more expensive, and they don't do bombers, so I'd probably have stuck with Red Eagle/Skytrex. I looked at Reverisco, but price/postage was prohibitive for what will simply be game markers. The Wings of War models came up a lot. They're beautiful, but way too much for what I want.
DeleteHi Trebian -
ReplyDeleteI can relate to the fiddliness of biplanes. Possibly my favourite aircraft of WW2 is the Henschel 123 (Matchbox), though it's pretty anachronistic after 1941. A couple of years back I bought three packs of 1:350 Trumpeter interwar US naval aircraft, to 'go' with my 'Mighty Armadas' warships. I just liked the idea of them.
Clear plastic, teeny-tiny bits, impossible to manipulate without dropping them a few times (each) - fine tidbits for plasticivorous carpets... Fortunately I know a trick to locate dropped plastic motes before they get swallowed up. I got lucky. Eighteen aircraft - 3 types. But without the assistance of technicolour language, they would never have been built.
Cheers,
Ion
I work on models with all the bits in a tray - actually a CD case box lid - to stop losing bits and I still do. What is the trick for finding clear plastic on a carpet, please.
DeleteAh, this reminds reminds me of the joy of trying to stick Airfix biplanes together. Well done Graham, brave man! That is why my WW1 aircraft alll came pre assembled....
ReplyDeleteSuperglue makes it so much easier. I recall dissolving bits of Airfix planes because they wouldn't stick first time and I kept adding glue.
DeleteAh, I sympathise with your travails as even I, a professional modelmaker of some 33+ years, struggled with these kits! I love the look of them but God are they hard work. If I did venture into air combat, I would go down the 6mm route for sheer ease of assembly etc.
ReplyDeleteBTW, the Valom kits are wonderfully detailed but I gave up on trying to assemble them as they are even harder than the Skytrex ones!
Harder than Skytrex... I think I'll steer clear.
DeleteWell done
ReplyDeleteMy simple motto is slow, slow and slowly put these bloody things together
Drill those holes and drop the wings into struts left to dry solid
It is a super glue nightmare at time but walk away and have a coffee if frustrated ;)
I certainly won't be building the remaining models in a single afternoon.
Delete