This was my last Tuesday game before the end of the year, and I went for another go at Adrian Nayler's "Blood Red Roses". We realised after the last game that we'd played a few things not quite right, but we'd been impressed enough to want to play it again.
The real test will be when we try and run a historical scenario, but before I can map a historical battle onto the game system I really need to understand it properly. I therefore dealt the army generation cards out at random, and allocated them fairly evenly across the three "wards". Phil & Tim got the Yorkists, and had a small mounted reserve. Jon joined us online, and we shared the Lancastrians, him taking the left hand ward, which was nearest the video feed.
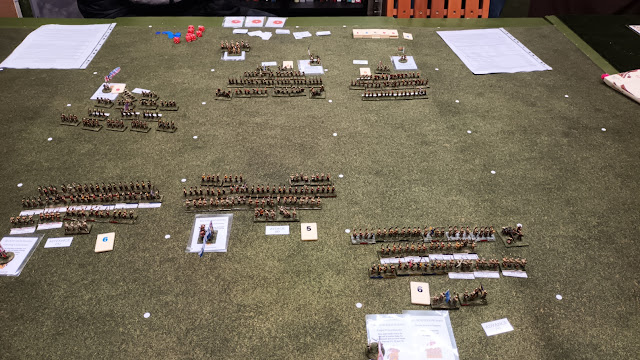
I'd had some updates from Adrian after the last game report, which included a change to the artillery rules. Having more gunpowder weapons that your opponent now boosts your cohesion to a limited extent, and guns fire in a pre-game bombardment phase. The Yorkists out numbered us in this area, and boosted their central ward to a cohesion of seven from the usual six, and knocked our central ward down to five. I probably still needed to attack in the middle, as I had a commander who could change battle stance without testing "mettle". Our other leadership cards were less helpful. Jon's worsened his saving roll in melee, and the other wing had a predilection to treachery. Not auspicious at all. Our plan, more or less, was for Jon to get in bow range and shoot away like mad whilst I attacked in the centre and kept the right wing out of trouble. First job was to get off the baseline as hanging back gives the enemy "Happenstance" cards.
Not all of our stuff seemed to want to move. Our opponents decided mostly to hold in place, but Phil attacked on their right. Some shooting was done.

The centre ward is steadily cranking up the battle stance, and is now on "Attack". The aim is next move go to "Assault" and pile in, ignoring all that shooting stuff and getting to hand to hand. The right hand ward has moved up. Jon is shooting away and inflicting hits, but he is failing mettle/fatigue tests, so his cohesion is dropping.

Just ahead of the assault in the centre you can see on the left that Jon is gaining the upper hand in inflicting casualties. Reluctantly I need to bring up the right hand ward to stop the centre being flanked.

Fast forward a couple of turns (at least) and the right hand gamble has failed, as Tim's stout fellows break my chaps, and they head for the exit. In the centre my ward has smashed into the Yorkists, and inflicted masses of casualties. However Tim is clinging on and our cohesion levels are the same. I need to destroy him before my mettle rolls hand victory to our opponents.
On the left, you can just see a blue "2" cohesion marker. Jon has Phil on the ropes, so he is bringing up his reserve cavalry to bolster his flank and launch a counter attack.

Too late! Before Phil can amalgamate the reserve into his right hand ward Jon delivers another devastating volley of arrows, and Phil breaks. It's now one enemy ward broken each. Who will come out on top?

It's us! The Yorkist centre becomes subject to the new "Overwhelmed" rule, having dropped to level 1 cohesion, and being outnumbered massively.
We really pulled that one out of the fire, and I thought we were beaten as our cohesion was dropping faster than theirs due to our vigorous attacking.
We're enjoying the system, which certainly has something about it that looks and feels like a Wars of the Roses battle. It handles a lot of figures on the table well, and is a manageable game system. Not overly complicated, but you do need to remember to do everything in sequence, and draw your extra Happenstance cards when the appropriate things happen. We also had a chat about when these can be played. We may have been too flexible, but I suspect it didn't affect the final outcome.
I think I'm in a position to look at running a refight now.
The question is; which battle?
Graham, this was another interesting game, one I thought we lost too. I sure could have used a Happenstance card or two to bolster my Ward's Cohesion. I look forward to a historical refight. The game may handle a lot of figures but since the number of BMUs is small (only three each in this battle), the number of figures/stands (besides counting stands for combat and removing casualties) are irrelevant to play. Given that, both the game and decisions points are small. Having only three BMUs per side makes most games manageable. Heck, even OHW has six BMUs per side. For comparison, Richard's WotR game with the same number of BMUs seems to have much more going on.
ReplyDeleteFor me, the jury is still in deliberation on tallying stands and combat factors to arrive at a fixed or deterministic hit count. Needing a slate at hand to track the count of each unit type and then adding them up would be unworkable with more than a few BMUs. If my design, I would probably be in search of methods to abstract and simplify this process. Saying that, I did enjoy the game and the rules are interesting.
Thank you for hosting.
There are only 3 BMUs (4 for the Yorkists), but each one is subdivided into companies, so you do need quite a few of the little guys to keep track of them. I think that getting a straight deterministic hit count, modified by the saving roll works well. Better than roll to hit, roll to save. It gives the player the chance to risk their better protected companies but with the jeopardy of losing cohesion. Calculating the numbers isn't too bad. I only used the white board as I was running the numbers for everyone in SHQ at first, and my head was beginning to overload with game management stuff. I think that if you are on top of what is going on and managing Happenstance actively to ensure you never need to discard cards there's enough to keep you occupied. I like the model in Richard's game, but it could be too involved at times.
DeleteWe'll see how we feel once we refight Towton or something with them.
I agree that the deterministic hits with saving throw combination worked. The variable saving throw added some uncertainty into the fixed hit component.
DeleteI was thinking about how you'd make it in to an attack roll, rolling a d6 for each hit. But as the target units have a range of armour classes that doesn't work. I think in many ways it is the only solution unless you are going to double the number of dice rolls. It's quite elegant, actually.
DeleteHello all! This is really an interesting approach to the Wars of the Roses battles. I can see plenty of room for adapting the same criteria to other historical periodo as well. I look forward to reading more of it and to seeing it published.
ReplyDeleteBruno, Italy.
It's very much a line them up and have a go set of rules, which fits the WotR. I don't know who else they might work for. The SoA are rumoured to be thinking of publishing them.
DeleteThe composite nature of the Wards with these rules, for instance, makes me think of similar combined-arms samurai contingents during the Sengoku Jidai. Of course, a very different command & control needs to be contemplated.
DeleteI bow to your superior knowledge in respect of Japanese medieval warfare.
Delete