Since I started work on my English Civil War armies over the last year or so it became my intention to refight all of the battles from the Bishops War to Naseby that were fought in England (can't be bothered with Ireland and that Montrose stuff with its Irish super troops et al).
My intention started to seem viable once I'd worked out my ECW rules "Victory Without Squares", based on Richard Brook's Red Square system. With a figure scale of 1 base = 200 men, and 4" = 250 yards I can get pretty much every battle on my table top with my figures. Except Marston Moor perhaps.
I have no intention of fighting them in order, - that would be excessively nerdy. And it would be nice to visit the battlefields before I do them, although I suspect that won't ever happen.
However in the case of Lansdown I've driven across the battlefield on numerous occasions, and in particular known the infamous Freezing Hill Lane quite well. Plus I've got John Wroughton's recent book on the battle. Admittedly I haven't read it yet, but I own it, which is the important thing.
I was going to research the game Thursday evening and Friday lunchtime, but due to some unforeseen Real Life events (including the head gasket blowing on Miss Trebian's car) I didn't quite get all of the reading done. However I had just enough time to put together an army list for each side and knock up a quick battlefield layout. See, - Real Life, sometimes I'm unstoppable.
The armies were:
Parliament
Commanded by Sir William Waller & Sir Arthur Haselrigg (Cavalry)
1 Brigade of Infantry (4 shot, 2 pike)
2 Companies "Commanded shot"
3 Companies of Dragoons
2 Regiments of Cavalry (each 6 bases in two ranks)
1 Artillery battery
Royalists
Commanded by Sir Ralph Hopton, Sir Bevil Grenville (Cornish foot) & Prince Maurice (Cavalry)
1 Brigade Cornish Pike (6 pike)
1 Brigade of Infantry (4 shot, 2 pike)
4 Companies "Commanded shot"
2 Companies of Dragoons
3 Regiments of Cavalry (each 3 bases in one rank)
2 Artillery batteries.
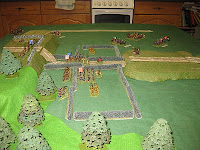
The table looked like the photo below, with Sir William's forces arrayed on Hanging Hill, the cavalry deployed facing each other to the West, and the rest of the Royalists poised on Freezing Hill to the North. The Cornish pike are in the middle on Freezing Hill Lane.
 The armies were commanded by Ian, as Sir William, Will, as Sir Ralph, and Phil (when he got there, - about turn 2) as Sir Bevil.
 Here's a close up picture of the Freezing Hill deployment, showing the Royalists raring to go. Their artillery is deployed well forward, - a good move I thought to enable them to soften up the nasty looking Parliamentarian position.
 The Parliamentarians are in a pretty strong position. Waller was well known by the end of the war as a good reader of ground, and you can see it at Lansdown. The approach to Hanging Hill is very steep (not as steep as the photo, but you use what you can) and he dominated it with earthworks. His flanks are secured by wooded areas plus the ground to the top of the photo is even steeper than that in front of the position.
 The game opened with the cavalry skirmishing whilst the infantry awaited the arrival of Sir Bevil. In a brilliant one - two with a couple of his cavalry regiments Prince Maurice broke one of Sir Arthur's units, despite the Parliamentarians having a number of advantages. In truth you can't beat good die rolling. You can see the Parliamentarians streaming away to the rear, one of Maurice's Regiments in hot pursuit. Right at the top, next to the boundary tape you'll see that the Royalist dragoons have dismounted, in order to better defend themselves against the onrushing Parliamentarian cavalry (!). In the middle the Parliamentarian dragoons are advancing to sieze the cornfield on their side of the road.
 With the arrival of Phil "Sir Bevil" Steele the Royalists really decided to get stuck in. Not wishing the pike assault to be disrupted by dragoon fire from the flanks the other Brigade of foot was thrown forward on the flank. In the cavalry action Hasilrigg decided to dispose of the dismounted dragoons before getting stuck into the Royalist cavalry. By this point the Royalists not pursuing the fleeing Parliamentarians were both Unsteady (hence the markers) so it might have been better to get stuck in earlier on but you never know. Mysteriously the Royalist guns opened up counter battery fire, ignoring the position they had to attack, whilst Waller's gun tried to unsettle the Cornish pike.
 The Cornish pressed on up the Lane, braving the hail of shot from the hill, their progress due in no small part to the inspirational presence of Sir Bevil. On their left the Royalist foot had driven the dragoons back from the hedgeline, making them Unsteady in the process. The cavalry action was now over, the Parliamentarians completely routed due to some stunning die rolling. The stage was all set for the final assault on the ridge.
 Lead personally be Sir Bevil the first charge up the hill wasn't completely successful, although it did make Waller's infantry Unsteady. More importantly, however, it pinned them in position as the other Royalist infantry fought their way up the slope and dislodged the dragoons who were now holding the earthworks. All it needed from the Royalists was one last push from the Cornish to keep the Parliamentarians in place so their comrades could turn the line.
 So, one last charge went in, which resulted in the Parliamentarians being pinned in position, and shaken. In the melee Sir William was unhorsed, but ALAS! Sir Bevil was tragically slain at the head of his troops, who were broken and fled down the hill. However, this was the last hurrah for Parliament....
 The remaining Royalist foot had managed to see off the dragoons and formed up to give Waller's men a decisive volley in the flank, causing them to break and flee. Fortunately for Sir William he was back up on his horse and able to flee with them. So, a win for the Royalists, again with heavy casualties, but on this occasion having destroyed the Parliamentarian field force in the West.
All the players claim to have enjoyed themselves and we got it all done in about two hours. I do need to go back to my sources and see that I did get the deployments and so on correct. I didn't give Waller a position to fall back to, so his hanging on to the ridge line was a bit enforced, and cost him dearly. On the other hand he came out really badly in the cavalry fight due to some better tactics and some incredibly good die rolling by Prince Maurice.
Still, that's one battle in the bag. What next?
The remaining Royalist foot had managed to see off the dragoons and formed up to give Waller's men a decisive volley in the flank, causing them to break and flee. Fortunately for Sir William he was back up on his horse and able to flee with them. So, a win for the Royalists, again with heavy casualties, but on this occasion having destroyed the Parliamentarian field force in the West.
All the players claim to have enjoyed themselves and we got it all done in about two hours. I do need to go back to my sources and see that I did get the deployments and so on correct. I didn't give Waller a position to fall back to, so his hanging on to the ridge line was a bit enforced, and cost him dearly. On the other hand he came out really badly in the cavalry fight due to some better tactics and some incredibly good die rolling by Prince Maurice.
Still, that's one battle in the bag. What next?
Perfectly timed to mesh with the article on Lansdown in the current issue of 'Battlefield' magazine (journal of the Battlefields Trust).
ReplyDeleteVery interesting.
What can I say? I'm in touch with the zeitgeist.
ReplyDeleteI'm becoming interested in the ECW again - partly because, after all these years, Napoleonics has become a bit stale and I need something fresh; also because my next door neighbour is a great admirer of Cromwell so I might persuade him to take part in the odd game, provided he plays the Parliamentarians! -some nice small battles that make colourful tabletop games. They also make interesting vehicles to play out using different rules systems for comparison or just the pure desire to experiment.
ReplyDeleteI found your blog via Bob Cordery's Wargaming Miscellany. Have you published your Vistory without Squares rules anywhere?
Regards, Arthur
They're not published anywhere else, but check out my latest posting.....
ReplyDelete