The exchange programme between Shedquarters and Shed West is supposed to happen quarterly, but we missed a few months, then we were in SHQ a few weeks back. Anyhow, Richard of Shed West had a week's holiday at home in mid-August, so we were able to head off down there inside a month, to get us back on achedule. Result!
Regular readers will know that we've done Dux Bellorum a couple of times. Chris A recently acquired a copy of DB for me in a bring and buy, and I noticed that I could make up a late Roman army using my Belisarian Byzantines. As the chaps haven't been out of the box for a while, and it is one of my "labour of love" armies I thought that would be a good place to start our games for the day.
So, an early start from Trebian Towers with a carload of wargames supplies plus Phil & Chris and we were in rural Wiltshire by about 10am, ready for a game of DB on some pre-laid out terrain.

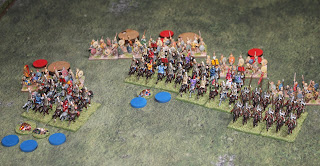
This is the core of my Late Roman Army. As you can see this threw Richard a bit, as I have taken all the cavalry options. He thought I'd be a bit more "shieldwall-y", and had chosen Saxon Warriors to deal with that threat. He also admitted later he'd put a few woods in the middle of the table to break up the steady shieldwall advance. That terrain in the middle favours warrior based armies above pretty much all other options. Shieldwalls and cavalry can't move in woods as well as warriors can, and are so funnelled into a central confrontation.

I could have used a more sophisticated set up. Well, I say "I", Chris was sharing command with me, but was quite happy for me to make all the mistakes on our behalf. Anyhow, I possibly should have split the army into smaller packets and tried some unflanking stuff. Instead, against Richard's advice, I decided to try to ride down his main battle line. After all, I've got some cataphracts in there somewhere, and they're awesome.

Turn one, and off we go rolling steadily forwards. Under the game set up we became the "Repellers", and the Saxons were "Aggressors". Quite why that means we have to attack I'm not sure.


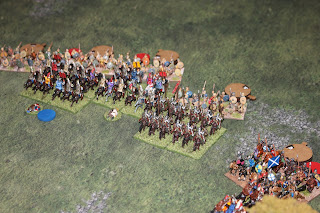
Our flanking skirmishing light horse was making good progress, and was pulling both their skirmishers out wide.

Because of the different angles we were set up at, and because I had cunningly put my slowest moving cavalry on the far end of the line, with the greatest distance to go, it looked like we would not hit the Saxon line simultaneously at all points.

We got a fair few in. Because of the way the move sequence works all cavalry move before all heavy foot...

...this enabled a Saxon unit to finish off the contacts with an uncontrollable charge on my cataphracts*.

Meanwhile Richard and Phil have whipped their mounted reserve round the end of the line to stop my overlap in the centre.

The first round of combats is a bit of a mixed bag. Our hits are shown with casualty markers. They are using those counter disc things you can get from Warbases or similar. We've been driven back on our left flank but pushed them back in the centre. The cataphracts have been held in place by the use of LPs to block hits.
The centre melee is sucking in LPs. We have 6 each, and as you can see we need 3 on our left hopefully to keep that unit in the game, and a couple in the middle are there to guarantee (ha!) we break that unit in front of us which is down to only one cohesion point left already.

Then the wheels start dropping off. The Light Horse fail a Bravery Test, and decide to just sit in front of skirmishing bowmen who shoot them to death in one move. This is doubly annoying, as it costs us an LP for next turn, and instead of our light horse causing havoc in their rear, the Saxons now have a preponderance of skirmishers.

It is a bit nip and tuck in the middle, but the mounted arm is proving its worth. It is only through outrageous fortune that they haven't broken through. At the top of the picture you can just see a unit of Saxon nobles edging into view. They will prove to be decisive, and, most annoyingly, are only able to participate in the central battle because they failed a Bravery test that would otherwise have seen them charge uncontrollably into our shieldwall infantry over on our left.
The unfortunate early loss of an LP due to the silliness with our light horse, and the fact we have to place ours first, has handed a lot of initiative to the Saxons. However, we are wearing them down.

Then the Saxons get a 2:1 fight with our skirmishers. We only need a single hit to break that unit with the counter behind it, so that's looking good.

We finally tempt the Saxons off their hill on our left, and withstand the charge.

Our central cavalry unit is broken, and the one on the left is forced back (lack of LPs really beginning to show now). The Saxon warriors top left are closing in on our flank.

And that skirmisher fight? No, we don't get our single hit, and they inflict many hits, breaking our skirmishers, so we lose another LP. This is annoying.

Again, another turn when we should break a unit or two, as they're down to one cohesion point left on several units, but LPs and lucky dice rolling keeps them in it.

Another unit gone...

...and another. Look at the LPs, saving the unit. It isn't as bad as it looks for us, they now have nearly every unit down to one cohesion point, so we are still in with a chance.

Our General, and the cataphracts to his right continue to battle hard. It's a bit of a slog, but then it is a shieldwall game.

Having to fight more than one unit, and forcing one back I then can't fight means my hits are being spread about rather than concentrating and breaking a single target.

Our "Ordinary" shieldwall finally breaks their opponents. Note to Saxons: If you are on a hilltop, stay there.

The Saxon skirmishers venture out of the wood, and the Noble Warriors line up their next target. No worries. A single hit, and the line breaks and we can ride away from them.

The cataphracts get their hit, but the General doesn't. He's caught in the vice and dies.

Now we've lost so many of our heavy units we need to make Bravery rolls to keep units fighting. So the cataphracts need to roll less than 10. Ah. A double six. Where were you when I needed some hits last turn? (BTW this is the second double six on a Bravery roll as you will know from above. Extremely annoying)
So a big win for the Saxons, but it was closer than it appears. We have all but one of their heavy units down to one hit to break. Their mounted commander has galloped off to avoid having to fight for this reason. A lot of the blame for our loss falls on my unsophisticated tactics, but we suffered with a couple of critical Bravery failures, - the Saxons didn't have one until half way through the game, when they actually needed it. And the terrain was against us, - home field advantage I suppose.
For all my moaning that was a fun game. There's a lot of tension and tense moments in DB. For a game intended for shieldwall combat the system stood up fairly well when used for something else, and I think it was more fun having a bit more variety in the game, instead of just blocks of infantry (Phil certainly thought so too). If I'd been involved in the playtesting I'd have suggested some changes, - I think that foot charging impetuously into moving horse from the front is hardly credible, but that's an easy fix.
Still, a fun start to the day. And I do like the look of my Late Romans.
* Yes, foot charging horse. Looks a bit odd, but this is a game based round leadership and foot tactics. I may have been guilty of taking a knife to a gun fight.
Regular readers will know that we've done Dux Bellorum a couple of times. Chris A recently acquired a copy of DB for me in a bring and buy, and I noticed that I could make up a late Roman army using my Belisarian Byzantines. As the chaps haven't been out of the box for a while, and it is one of my "labour of love" armies I thought that would be a good place to start our games for the day.
So, an early start from Trebian Towers with a carload of wargames supplies plus Phil & Chris and we were in rural Wiltshire by about 10am, ready for a game of DB on some pre-laid out terrain.

This is the core of my Late Roman Army. As you can see this threw Richard a bit, as I have taken all the cavalry options. He thought I'd be a bit more "shieldwall-y", and had chosen Saxon Warriors to deal with that threat. He also admitted later he'd put a few woods in the middle of the table to break up the steady shieldwall advance. That terrain in the middle favours warrior based armies above pretty much all other options. Shieldwalls and cavalry can't move in woods as well as warriors can, and are so funnelled into a central confrontation.

I could have used a more sophisticated set up. Well, I say "I", Chris was sharing command with me, but was quite happy for me to make all the mistakes on our behalf. Anyhow, I possibly should have split the army into smaller packets and tried some unflanking stuff. Instead, against Richard's advice, I decided to try to ride down his main battle line. After all, I've got some cataphracts in there somewhere, and they're awesome.

Turn one, and off we go rolling steadily forwards. Under the game set up we became the "Repellers", and the Saxons were "Aggressors". Quite why that means we have to attack I'm not sure.

Turn one had already thrown up a problem, as our skirmisher flank guard failed its Bravery test and wouldn't move. Even with two leadership points (LPs) to ensure that they would. The fail was on rolling a double 6 (high numbers bad for Bravery tests, good for combat) so that's just annoying. We'd miss those sixes later on in combat.
I should really have held back until the skirmishers were ready to move as we'd miss the flank guard later on, but I'd come all this way to play games, not to sit on my hands.

Our flanking skirmishing light horse was making good progress, and was pulling both their skirmishers out wide.

Because of the different angles we were set up at, and because I had cunningly put my slowest moving cavalry on the far end of the line, with the greatest distance to go, it looked like we would not hit the Saxon line simultaneously at all points.

We got a fair few in. Because of the way the move sequence works all cavalry move before all heavy foot...

...this enabled a Saxon unit to finish off the contacts with an uncontrollable charge on my cataphracts*.

Meanwhile Richard and Phil have whipped their mounted reserve round the end of the line to stop my overlap in the centre.

The first round of combats is a bit of a mixed bag. Our hits are shown with casualty markers. They are using those counter disc things you can get from Warbases or similar. We've been driven back on our left flank but pushed them back in the centre. The cataphracts have been held in place by the use of LPs to block hits.

The centre melee is sucking in LPs. We have 6 each, and as you can see we need 3 on our left hopefully to keep that unit in the game, and a couple in the middle are there to guarantee (ha!) we break that unit in front of us which is down to only one cohesion point left already.

Then the wheels start dropping off. The Light Horse fail a Bravery Test, and decide to just sit in front of skirmishing bowmen who shoot them to death in one move. This is doubly annoying, as it costs us an LP for next turn, and instead of our light horse causing havoc in their rear, the Saxons now have a preponderance of skirmishers.

It is a bit nip and tuck in the middle, but the mounted arm is proving its worth. It is only through outrageous fortune that they haven't broken through. At the top of the picture you can just see a unit of Saxon nobles edging into view. They will prove to be decisive, and, most annoyingly, are only able to participate in the central battle because they failed a Bravery test that would otherwise have seen them charge uncontrollably into our shieldwall infantry over on our left.

The unfortunate early loss of an LP due to the silliness with our light horse, and the fact we have to place ours first, has handed a lot of initiative to the Saxons. However, we are wearing them down.

Then the Saxons get a 2:1 fight with our skirmishers. We only need a single hit to break that unit with the counter behind it, so that's looking good.

We finally tempt the Saxons off their hill on our left, and withstand the charge.

Our central cavalry unit is broken, and the one on the left is forced back (lack of LPs really beginning to show now). The Saxon warriors top left are closing in on our flank.

And that skirmisher fight? No, we don't get our single hit, and they inflict many hits, breaking our skirmishers, so we lose another LP. This is annoying.

Again, another turn when we should break a unit or two, as they're down to one cohesion point left on several units, but LPs and lucky dice rolling keeps them in it.

Another unit gone...

...and another. Look at the LPs, saving the unit. It isn't as bad as it looks for us, they now have nearly every unit down to one cohesion point, so we are still in with a chance.

Our General, and the cataphracts to his right continue to battle hard. It's a bit of a slog, but then it is a shieldwall game.

Having to fight more than one unit, and forcing one back I then can't fight means my hits are being spread about rather than concentrating and breaking a single target.

Our "Ordinary" shieldwall finally breaks their opponents. Note to Saxons: If you are on a hilltop, stay there.

The Saxon skirmishers venture out of the wood, and the Noble Warriors line up their next target. No worries. A single hit, and the line breaks and we can ride away from them.

The cataphracts get their hit, but the General doesn't. He's caught in the vice and dies.

Now we've lost so many of our heavy units we need to make Bravery rolls to keep units fighting. So the cataphracts need to roll less than 10. Ah. A double six. Where were you when I needed some hits last turn? (BTW this is the second double six on a Bravery roll as you will know from above. Extremely annoying)
So a big win for the Saxons, but it was closer than it appears. We have all but one of their heavy units down to one hit to break. Their mounted commander has galloped off to avoid having to fight for this reason. A lot of the blame for our loss falls on my unsophisticated tactics, but we suffered with a couple of critical Bravery failures, - the Saxons didn't have one until half way through the game, when they actually needed it. And the terrain was against us, - home field advantage I suppose.
For all my moaning that was a fun game. There's a lot of tension and tense moments in DB. For a game intended for shieldwall combat the system stood up fairly well when used for something else, and I think it was more fun having a bit more variety in the game, instead of just blocks of infantry (Phil certainly thought so too). If I'd been involved in the playtesting I'd have suggested some changes, - I think that foot charging impetuously into moving horse from the front is hardly credible, but that's an easy fix.
Still, a fun start to the day. And I do like the look of my Late Romans.
* Yes, foot charging horse. Looks a bit odd, but this is a game based round leadership and foot tactics. I may have been guilty of taking a knife to a gun fight.
Great looking army and fantastic batrep.
ReplyDeleteCheers, Ross
Thanks. As I said, I love this army and don't get to use it often enough.
DeleteDespite the moshing, it looked like a fun game. Nifty strategem to place the slowest horse in a situation to traverse the greatest distance!
ReplyDeleteYeah. Brilliant strategist me. I don't know if it made a difference in the end. If they'd been the other end they'd have inflicted more hits, probably, and might have broken through and got out of the way of those pesky noble warriors more than the ordinary horse I had at that end.
DeleteNice Batrep!
ReplyDeleteGlad you like it. My aim is to please.
DeleteGood AAR
ReplyDeleteRenko has been trying to get me for a while to play DB
But not in 20mm ;)
Well, we haven't tried it in 20mm yet either. Seriously the measurements are given in Base widths, so no scale is an issue.
DeleteI rather enjoy it, as I think is clear above, but doing a lot of shieldwall v shieldwall games probably becomes tedious.