Following our epic refight of the Battle of Marston Moor I turned my attention to the southern campaign, and had a look at the Battle of Cropredy Bridge in the summer of 1644.
This is an awkward one. The armies don't line up and face each other, and the battle is fought in a rambling fashion over a large area, mostly by cavalry. On the other hand I was aware that the battle had been re-fought using the "Victory Without..." rules at COW many years back, so it must be possible, right?
My first call was the Nugget reports on the original COW game, and alas, they were not much help. Other than to let me know that the battle was an awkward one to fight.
I had to adjust the battlefield a bit as I wanted to use the squares again. I also modified the movement rules, increasing the distance units covered. Otherwise we'd have been there all night before anyone hit anyone (a problem the game at COW had I think). Unfortunately I probably over did it a bit.
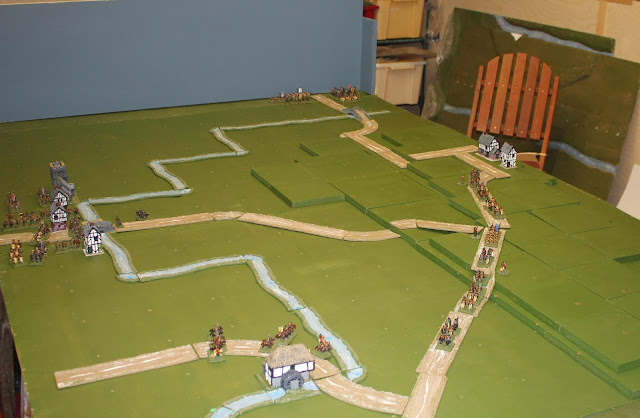
This is the set up. The King's Army of Oxford has been playing cat and mouse with Waller's smaller army, and has got itself strung out as the Vanguard rushes off to the top of the picture, across Hay's Bridge to try and run down some Parliamentarian forces.
Seeing that this has evened up the numbers a bit Waller launches a pincer movement across two crossing points to pinch off the trailing units of the Royalist Army.
Waller and his cavalry brigade are at the bottom, just getting ready to cross the Cherwell at Slat's Mill. In the centre left his number two, Middleton, is ready to cross at Cropredy Bridge and accompanying ford, with the bulk of the army. He has to seal off the split in the Royalist forces by taking and holding Hays Bridge, and then combine to destroy the trailing units.

The game opened with Parliament rushing the dragoons defending Cropredy Bridge and ford, sweeping them away...

...Hazelrigge's Horse pursued them towards Hays Bridge.

The rest of Middleton's force burst across the river, and rushed for the higher ground. Out of shot, Waller's force was more cautious as it crossed the ford by the Mill, and tried to negotiate its way up the steep slope, against the grain of the ridge and furrow fields.

The Royalist column continued to head for Hays Bridge, but a couple of cavalry brigades wheeled off to provide cover.

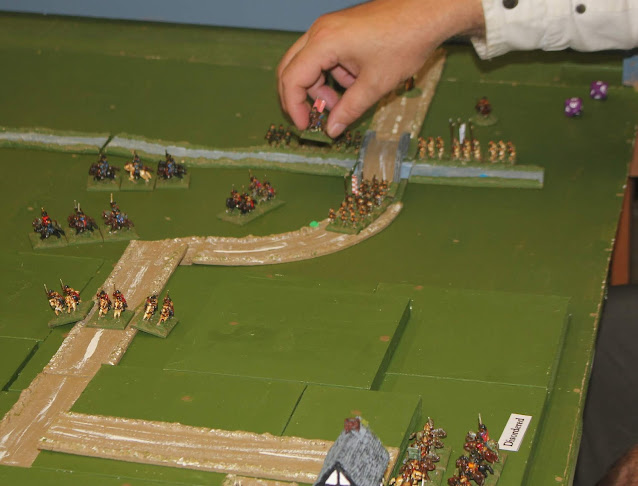
Sorry for the fuzzy nature of this picture. Hazelrigge's men (centre of the picture) managed to get up on the ridge line quicker than anyone expected (told you I got the move distances wrong), but the Royalist horse reacted quickly and turned to face.

Much to everyone's surprise the Royalist horse broke, and were pursued past their surprised foot. By this point two Royalist commanders had been unhorsed and captured, but I forgot to take pictures.

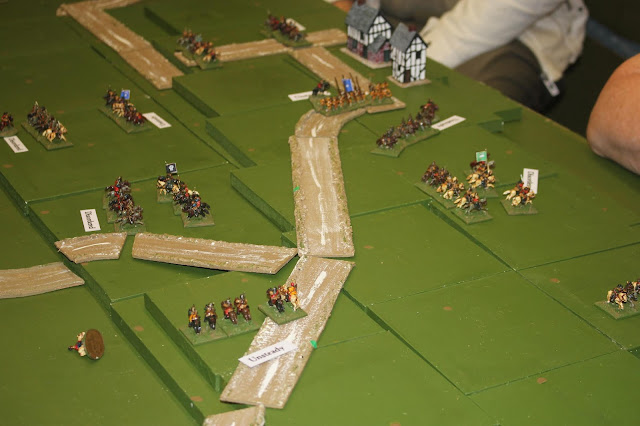
The Parliamentarians also had another win a bit further south, and that surprise rendered the unit next to them "Unsteady". So far Waller's plan was going much better than it did historically.

Waller's problem was that he was struggling to get his horse up the steep hill near the camera. Nothing was stopping the onward march of his foot across the table, however.
Eventually they burst up onto the ridge line, breaking their opponents at the cost of Waller falling off his horse.

Alas for Middleton he was unable to get his dragoons to Hays Bridge in time, and elements of the King's forces were able to return.

This prompted Richard, as Middleton, to start to form a defensive position with his foot to counter the threat.
Phil was rushing his cavalry across the river as quickly as the bridge would allow.

Meanwhile Astley had formed his foot into a hedgehog as the cavalry melees swirled around him.

At the bottom of the picture a very confused cavalry melee has some Parliamentarian horse broken by their Royalist opponents...

...who are shortly charged in the rear by some other Parliamentarian horse such that both units flee across Cropredy Bridge together, heading for Banbury and screaming "all is lost".

The Royalists were now holding Hays Bridge very securely.

Middleton is now sort of trying to conduct a retreat back to Cropredy, but he keeps changing his mind.

The Royalists are now firmly positioned on the hill in front of Wardington. Scrappy cavalry melees are taking place all over the board, with units being caught in the flank and rear as local superiority occurs.

As night fell the Royalist counter attack had stopped the Parliamentarians, who were now certainly falling back from their high water mark. Waller has inflicted significant damage on the Royalists, but at a cost that has also weakened his army. Probably a better result for him than historically, however.
The game proved challenging but did provide an evening's entertainment. I had identified a number of the issues that would occur, but unfortunately didn't get all the fixes right. More work needs to be done to get it right, if I was to play it again.
The rules may have run their course. They have proved a useful tool to get real battles on the table top, but their limitations are becoming clearer. They work best if you use playing card activation most likely, and for a multiplayer game that just slows it down to much. The hand to hand rules are really too much of a blunt instrument with massive amounts of luck in them.
Where we go next, I'm not sure. The figures used for this battle were actually painted as the King's Army at Oxford and Waller's Army, but because of the figure scale I didn't get most of the foot regiments on the table. The units were painted as one base equals 50, but the figure scale here is 1 base equals 200. I want to use more of them in a more detailed and involved system. Phil is keen on Advanced Armati, and that does provide a good game. I think for my own peace of mind I have to look at the whole thing from scratch and see where I get to.
This is an awkward one. The armies don't line up and face each other, and the battle is fought in a rambling fashion over a large area, mostly by cavalry. On the other hand I was aware that the battle had been re-fought using the "Victory Without..." rules at COW many years back, so it must be possible, right?
My first call was the Nugget reports on the original COW game, and alas, they were not much help. Other than to let me know that the battle was an awkward one to fight.
I had to adjust the battlefield a bit as I wanted to use the squares again. I also modified the movement rules, increasing the distance units covered. Otherwise we'd have been there all night before anyone hit anyone (a problem the game at COW had I think). Unfortunately I probably over did it a bit.

This is the set up. The King's Army of Oxford has been playing cat and mouse with Waller's smaller army, and has got itself strung out as the Vanguard rushes off to the top of the picture, across Hay's Bridge to try and run down some Parliamentarian forces.
Seeing that this has evened up the numbers a bit Waller launches a pincer movement across two crossing points to pinch off the trailing units of the Royalist Army.
Waller and his cavalry brigade are at the bottom, just getting ready to cross the Cherwell at Slat's Mill. In the centre left his number two, Middleton, is ready to cross at Cropredy Bridge and accompanying ford, with the bulk of the army. He has to seal off the split in the Royalist forces by taking and holding Hays Bridge, and then combine to destroy the trailing units.

The game opened with Parliament rushing the dragoons defending Cropredy Bridge and ford, sweeping them away...

...Hazelrigge's Horse pursued them towards Hays Bridge.

The rest of Middleton's force burst across the river, and rushed for the higher ground. Out of shot, Waller's force was more cautious as it crossed the ford by the Mill, and tried to negotiate its way up the steep slope, against the grain of the ridge and furrow fields.

The Royalist column continued to head for Hays Bridge, but a couple of cavalry brigades wheeled off to provide cover.

Sorry for the fuzzy nature of this picture. Hazelrigge's men (centre of the picture) managed to get up on the ridge line quicker than anyone expected (told you I got the move distances wrong), but the Royalist horse reacted quickly and turned to face.

Much to everyone's surprise the Royalist horse broke, and were pursued past their surprised foot. By this point two Royalist commanders had been unhorsed and captured, but I forgot to take pictures.

The Parliamentarians also had another win a bit further south, and that surprise rendered the unit next to them "Unsteady". So far Waller's plan was going much better than it did historically.

Waller's problem was that he was struggling to get his horse up the steep hill near the camera. Nothing was stopping the onward march of his foot across the table, however.

Eventually they burst up onto the ridge line, breaking their opponents at the cost of Waller falling off his horse.

Alas for Middleton he was unable to get his dragoons to Hays Bridge in time, and elements of the King's forces were able to return.

This prompted Richard, as Middleton, to start to form a defensive position with his foot to counter the threat.

Phil was rushing his cavalry across the river as quickly as the bridge would allow.

Meanwhile Astley had formed his foot into a hedgehog as the cavalry melees swirled around him.

At the bottom of the picture a very confused cavalry melee has some Parliamentarian horse broken by their Royalist opponents...

...who are shortly charged in the rear by some other Parliamentarian horse such that both units flee across Cropredy Bridge together, heading for Banbury and screaming "all is lost".

The Royalists were now holding Hays Bridge very securely.

Middleton is now sort of trying to conduct a retreat back to Cropredy, but he keeps changing his mind.

The Royalists are now firmly positioned on the hill in front of Wardington. Scrappy cavalry melees are taking place all over the board, with units being caught in the flank and rear as local superiority occurs.

As night fell the Royalist counter attack had stopped the Parliamentarians, who were now certainly falling back from their high water mark. Waller has inflicted significant damage on the Royalists, but at a cost that has also weakened his army. Probably a better result for him than historically, however.
The game proved challenging but did provide an evening's entertainment. I had identified a number of the issues that would occur, but unfortunately didn't get all the fixes right. More work needs to be done to get it right, if I was to play it again.
The rules may have run their course. They have proved a useful tool to get real battles on the table top, but their limitations are becoming clearer. They work best if you use playing card activation most likely, and for a multiplayer game that just slows it down to much. The hand to hand rules are really too much of a blunt instrument with massive amounts of luck in them.
Where we go next, I'm not sure. The figures used for this battle were actually painted as the King's Army at Oxford and Waller's Army, but because of the figure scale I didn't get most of the foot regiments on the table. The units were painted as one base equals 50, but the figure scale here is 1 base equals 200. I want to use more of them in a more detailed and involved system. Phil is keen on Advanced Armati, and that does provide a good game. I think for my own peace of mind I have to look at the whole thing from scratch and see where I get to.
Nice AAR
ReplyDeleteThe cycle of wargaming coming back to look at an old period with fresh eyes
Enjoy
Yes. Every so often you need to put something away, then pick it up later to make progress.
DeleteGreat AAR and its always good to see smaller scale figures on the table.
ReplyDeleteHorses for courses. To do refights on a table of this size 15mm is the best answer.
DeleteHad a go at Cropredy some years ago.- using Forlorn Hope- as I recall our version was almost entirely a cavalry clash as Wallers foot failed to cross the rive in any major numbers until near thend by which time most of Middletons command had been seen off by Cleveland and Stuart. Mind you your report makes me want to have another bash . Thanks
ReplyDeleteI think it is a battle that needs a lot of thinking and planning to get the re-fight right. There's a need for special rules, probably, as it isn't your typical battle.
DeleteAnd good to hear you use forlorn Hope. I helped to write the first edition, with Pete Berry, before Ben Wilkins took over.