Several people have asked about how I do squares. So here is a short posting about how I go about making them.
I've had several goes at this over many years, and the facilities available to me have changed over time as I now have a big table to do things on.

My first cloth was 1' squares marked in 6"sub-divisions. As I didn't have a big area to lay the full cloth out I made a template that I could mark through, and then tessellate it across the cloth on the dining room table. This worked reasonably, but you have to be very careful to make sure your squares line up. As you can see I do not mark the edges. I only ever mark the corners for orthogonal grids (off set squares are another problem) and that is really enough.

As you can see more clearly in this picture the corners of the big square are painted on in brown and those of the smaller squares were done with marker pen. Looking back at these now probably 20 years after I did them (!) they would have worked just as well with smaller dots.
I used the same technique on my Sudan desert cloth, although in this case I only wanted 6" squares, and I felt confident enough just to use small dots placed with a permanent marker.


Moving on, I needed a smaller sized grid on a green cloth but this time I knew the size of grid I wanted. I was able to buy some plastic table cloth with a fabric backing that takes paint. So I've painted the side that isn't the white and blue check. As I was able to lay this out on my table properly and by this point I've got some long, straight edges so I can be confident about the spacing. Having painted the back in my normal green I dotted in the corners with a permanent marker and then covered them with blobs of brown paint. These are so inconspicuous that we normally game on this surface whether we're using squares or not.
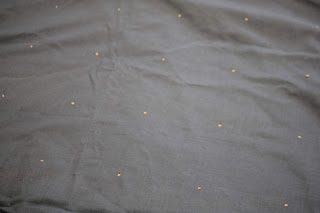
Lastly, this is my blue sea cloth. As this is old cotton curtains, and I want one side without squares I couldn't use the permanent marker. I found I could make a mark with a pencil that I could see and then just put a small blob of thick white emulsion paint on it. I didn't want it to soak through, so lower water content was essential.
All of these techniques mean you have to spend some time on the production. If you can't be bothered you can pay someone to print one for you. But the most important thing is not to bother with the edges. Alas that's something you can't avoid for offset squares.
I've had several goes at this over many years, and the facilities available to me have changed over time as I now have a big table to do things on.

My first cloth was 1' squares marked in 6"sub-divisions. As I didn't have a big area to lay the full cloth out I made a template that I could mark through, and then tessellate it across the cloth on the dining room table. This worked reasonably, but you have to be very careful to make sure your squares line up. As you can see I do not mark the edges. I only ever mark the corners for orthogonal grids (off set squares are another problem) and that is really enough.

As you can see more clearly in this picture the corners of the big square are painted on in brown and those of the smaller squares were done with marker pen. Looking back at these now probably 20 years after I did them (!) they would have worked just as well with smaller dots.

I used the same technique on my Sudan desert cloth, although in this case I only wanted 6" squares, and I felt confident enough just to use small dots placed with a permanent marker.

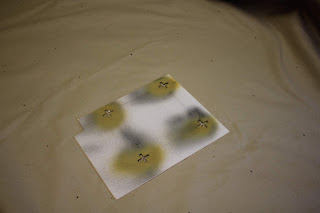
This sheet is my go-to playing surface for "It's Getting A Bit Chile". The mat is made from large vinyl advertising sheets that a friend of mine had as he ran a camping shop. I was able to paint it with the colours I use for my figure bases (the type of paint I use is decorating matt vinyl that I have mixed to specific colour codes by the local DIY supermarket). I realise that this material isn't available to everyone, but this is how I broke through in determining grid size. I wasn't sure about the size I wanted, so I experimented with white sticky dots as you can see in this post: link. In the picture above I have painted over the dots with green to contrast with the mat but rendered them inconspicuous as using the same colour as I used for giving texture to it all.

Moving on, I needed a smaller sized grid on a green cloth but this time I knew the size of grid I wanted. I was able to buy some plastic table cloth with a fabric backing that takes paint. So I've painted the side that isn't the white and blue check. As I was able to lay this out on my table properly and by this point I've got some long, straight edges so I can be confident about the spacing. Having painted the back in my normal green I dotted in the corners with a permanent marker and then covered them with blobs of brown paint. These are so inconspicuous that we normally game on this surface whether we're using squares or not.

Lastly, this is my blue sea cloth. As this is old cotton curtains, and I want one side without squares I couldn't use the permanent marker. I found I could make a mark with a pencil that I could see and then just put a small blob of thick white emulsion paint on it. I didn't want it to soak through, so lower water content was essential.
All of these techniques mean you have to spend some time on the production. If you can't be bothered you can pay someone to print one for you. But the most important thing is not to bother with the edges. Alas that's something you can't avoid for offset squares.
Thanks for posting this guide Graham. You've certain saved me a few trial and errors.
ReplyDeleteIt's what it is all about, this blogging stuff. I have to be very careful as I am naturally cack handed and unable to draw a straight line on a flat surface using a T-square and a 4H pencil. I was rubbish at Technical Drawing at school.
DeleteOn my old gridded cloths I did do the edges of the squares (using marker pens, I found red worked well on brown cloths).
ReplyDeleteFor my newer cloths I just do dots as well.
I am fortunate enough to have sufficient floor space to lay the cloths out, as well as a very long builder's aluminium ruler. If the weather is nice I just do this stuff out in the garden, much to the amusement of the neighbours. It is more socially acceptable than putting up my Zeltbahn tent for waterproofing or hanging my Afrika Korps uniform out in the Sun for eight weeks so it faded realistically:)
It's the bending over on the floor that I find difficult. Hard on the back and the knees.
DeleteI'd be more than happy if my neighbours just found me amusing, rather than screaming hysterically at people from time to time when they come to visit Shedquarters.
Thank you for this post - very useful for the future prep of gaming sheets / mats.
ReplyDeleteHappy to help. It is much easier than people imagine before they start, as long as you prepare properly and have a clear idea what you are trying to achieve.
Delete