Next Monday the Monday Night Group are going to see "1917", instead of having a game. We did the same with "Dunkirk", as not all our spouses were as keen to see a war film as we were. To get us in the mood I put on a WW1 game.
Most of my games in the latter part of the wear have been Allied attacks so I thought I'd swap it round a bit and do something with a German attack instead. This is a bit more awkward than it should be as I don't have nearly as many Germans as I do Brits, so I needed something that I had the forces for.
After hunting around I found an action at the end of the 1918 Spring Offensive, when the Germans attacked Villers Bretonneux with the intention of threatening Amiens. This battle is best known for the "Savage Rabbits" action, where tanks fought tanks for the first time. Of course, that is a minor part of the battle, although it did blunt the march of the A7Vs which were causing havoc. It's also the only German tank attack of the war that relied entirely on home grown machines, rather than captured Mark IVs.
Like every one I've got A7Vs, so it was a chance to use them and even up the sides.
For this game I decided to use RFCMs "Square Bashing". I've used these before and been mostly pleased with them, although I have previously noted issues with them when trying to do refights. On the positive side, as they use squares it becomes easier to overlap a map onto the tabletop.
I had to do some hunting around, but I finally found some maps and orbats. The action I chose was the attack on 8th Division by the German 4th Guards Division. I had to fiddle around with the layout and set up a little bit, but it was close enough.
8th Division had recently received some new inexperienced drafts, and were being deployed in the new "defence in depth" scheme that the British Army was adopting. They had also taken over this stretch of the line fairly recently from the Australians, who had moved to higher, more readily defensible, ground to the North. An attack wasn't expected for a few days as the Germans had recently used persistent gas, and so were thought unlikely to put their troops through the area as it was something they tried to avoid.
Player briefings were:
The reserves in the case of the British were two Mark IVs and three Whippets. For the Germans I was going to recycle up to three battalions worth of casualties.
I didn't use the full SB set up process involving moving terrain and so on. I put out 4 objectives to encourage the German players to attack along historical lines, and hopefully give us the Savage Rabbits action on their left in the Bois d'Aquenne. To simulate the way the British held the front line I spread out battalions over two squares frontage and bolstered them with HMGs and a few mortars, as you can see. To simulate their recent occupancy of the area I classified their trenches as Hasty Defences. I also pushed them up to two squares from the German starting edge, to simulate the Germans getting really close due to heavy mist. The Germans also had an off table deployment area, rather than cram everything on the board.
Steve took the British, Richard and Phil took the Germans, with Phil on the right and Richard on the left.

Here's the German forces all lined up and ready to go.

The British wait in their defences, their attackers obscured by mist.

Not one to pass up an opportunity to attack, turn one and Phil is over the British defence line, his infantry leaving their armour support in their wake.

Steve launches an immediate counter attack...

.. but is bounced back by the elated Huns.

Phil has surged across the first line of defences and is heading off for Villers Bretonneux. He has despatched a battalion to deal with the remaining front line unit on the British left flank (he never deals with it throughout the game). Richard is up to the defences, and launches a double assault.
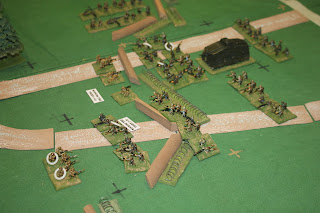
He is successful on the left, but held up by a gallant rearguard on his right.

Steve calls down a suppressive barrage to delay the attack (the German barrage rolls have been unmitigated failures up to this point). Luckily it doesn't stray, and drops a curtain of fire across the German line of attack.

The barrage is followed by a vigorous counterattack. Unable to retire because of the shelling behind them, Richard's forces take heavy casualties. Phil has less opposition, and is able to press on, out of shot at the top of the picture.

In his next turn Steve dropped a Point Barrage on the centre of the table, mainly frustrating Phil, who was desperately trying to avoid taking any morale tests if he could.

Alas the barrage was too much for some of his fellows, who turned tail and headed for the table edge.

At this point it looked like the German assault had stalled. Richard was back on his heels, and Phil's left had been forced back. However, Phil had now got his tank forwards, and was pressing on into Monument Wood, in front of V-B.

It was now time for the Germans to call in a suppressive barrage, which masked off the centre of Steve's second line whilst Phil assaulted objective 4, successfully.

Richard had now re-grouped and gone back on to the offensive.

For the first time the Germans had a tank in position, and drove it across the British defences, which collapsed.

From the resulting position it looked like Richard could roll up the rest of the British front line.

Phil was now firmly ensconced on objective 4, with the remains of a couple of British battalions hanging on to the table edge in front of them.
At this point we had to stop as chatting and me referring to rules I'm not really familiar with had slowed us down and it was getting on for midnight. It looked like the Germans were on top, but the Brits were holding on. The Game Countdown clock still had 6 points to go. We had a quick wash up and I explained what happened historically. Phil remarked that his Grandfather was with the Machine Gun Corps at the battle, which added some personal colour to the evening.
When I went out this afternoon to put everything away I decided to run through the next turn, as it was obvious what Phil & Richard were about to do.

I held on to objective 4, but launched assaults on the artillery next to them, and the Divisional HQ, now free from barrage smoke. These were both successful.The Germans now held all of V-B, except for one small toe hold in the corner.

Richard's troops were now able to start to roll up the front line, as anticipated.

The Germans now had a significant breakthrough on their left as well.

Time for the "Savage Rabbits", as Lt Mitchell and his tank force emerged onto the table to launch the counter attack.

Alas, tho', I threw a 6 for the countdown clock, and the game ended.
I totted up the Square Bashing victory points, as close as I could, and came up with a marginal British victory, which doesn't feel right. This was probably as the German left hadn't made enough progress, and the key rows and objectives were still mostly in the hands of 8th Division.
The players had said it played well. If I were to do it again I might look at a few things, and would certainly revisit the table layout. I did take some liberties, as you will be able to tell from the map below (half this sector was covered by 58th Div, but I shifted 8th Div across to cover it all as I had more info on them). In reality the Germans got all the way through VB, and made it to the table edge where Mitchell's tanks came on. It all looked very dicey for the Allies. Immediate counter attacks were ordered, but these were held off until nightfall, when the Australian counterattack went in and was completely successful. Most of the A7Vs were lost.

The Australian accounts stress the inexperience of the British troops, and say they were too keen to run away. That's easy to say when you've been moved out of the sector to a stronger position and not been attacked by tanks in positions you've only just occupied and have no anti-tank weapons. And 8th Division was weak, and held on remarkably well considering the odds stacked against them. The artillery men were notably brave, working their pieces despite being under heavy machine gun fire.
SB does have some issues. The ground scale / unit density isn't as scalable as I might like, and it is fairly broad brush in the way troops are represented. However, the constraints it imposes and the way it works does look like a WW1 Western Front battle, so I will persist with it. However, I have to say that even after all these years the rules are ramshackle, much as I love them and will continue to recommend them. There's no knowing where information might be, even tho' the rules have contents and an index. I hope I've done better than that with my latest set.
Most of my games in the latter part of the wear have been Allied attacks so I thought I'd swap it round a bit and do something with a German attack instead. This is a bit more awkward than it should be as I don't have nearly as many Germans as I do Brits, so I needed something that I had the forces for.
After hunting around I found an action at the end of the 1918 Spring Offensive, when the Germans attacked Villers Bretonneux with the intention of threatening Amiens. This battle is best known for the "Savage Rabbits" action, where tanks fought tanks for the first time. Of course, that is a minor part of the battle, although it did blunt the march of the A7Vs which were causing havoc. It's also the only German tank attack of the war that relied entirely on home grown machines, rather than captured Mark IVs.
Like every one I've got A7Vs, so it was a chance to use them and even up the sides.
For this game I decided to use RFCMs "Square Bashing". I've used these before and been mostly pleased with them, although I have previously noted issues with them when trying to do refights. On the positive side, as they use squares it becomes easier to overlap a map onto the tabletop.
I had to do some hunting around, but I finally found some maps and orbats. The action I chose was the attack on 8th Division by the German 4th Guards Division. I had to fiddle around with the layout and set up a little bit, but it was close enough.
8th Division had recently received some new inexperienced drafts, and were being deployed in the new "defence in depth" scheme that the British Army was adopting. They had also taken over this stretch of the line fairly recently from the Australians, who had moved to higher, more readily defensible, ground to the North. An attack wasn't expected for a few days as the Germans had recently used persistent gas, and so were thought unlikely to put their troops through the area as it was something they tried to avoid.
Player briefings were:
Villers Bretonneux – 24th April 1918
BEF 8th Division Major-General Sir Francis
Davis
8th Division has suffered badly during the German
Spring offensives, but has recently received a new draft of troops. However, it
is generally regarded as a good Division, and has been fully equipped with the
up to date Lewis Gun allocation. It has been moved to the Villers-Bretonneux
section, just in front of Amiens. Amiens is a key railway junction, its loss will result in the breakdown of Allied supply for a
large proportion of the Front. The Division has been placed in the newly developed
deep defence scheme, with two Brigades up and one in reserve. The position has
only recently been taken over from the Australians. The Germans have been
shelling and gassing the position. It is unclear if this heralds an attack or
not. The forces deployed are:
25th Brigade – Left hand side, covering
Villers-Bretonneux
2nd Battalion , Rifle Brigade (Left in front of VB, covering 2 squares + MG +
Trench mortar)
2nd Battalion, East Lancs (Defending V-B)
2nd Battalion, Royal Berkshire (in front of V-B for
counterattacks)
+ one section field guns
23rd Brigade – Centre, covering Villers-Bretonneux
& Bois d’Aquenne
2nd Battalion, West Yorks (left front of VB, covering 2
squares + MG + Trench mortar)
2nd Battalion, Middlesex Regt (right front, covering 2
squares)
2nd Battalion, Devonshire Regt (in Bois d’Aquenne for
counter attacks)
24th Brigade – Right, covering Bois
d’Aquenne
2nd Battalion , Northamptonshire Regt (right front, covering
2 squares)
2nd Battalion, Worcestershire Regt (in Bois d’Aquenne for
counter attacks)
Assets: Point Effect Barrage (10) Suppressive Barrage (9) Hold
the Line Orders (4)
Mobile reserves may be released to cover any breakthrough.
German Army – 4th Guards Division Gen-Maj Graf von Schweinitz
The Division has been tasked with capturing Villers-Bretonneux with a
view to enabling a further attack on Amiens, to disrupt Allied supply lines. This
attack will be the first assault made with the support of armoured vehicles.
The area has been subject to light shelling and Gas attacks.
5th Guards Grenadier
Regt (3 battalions)
5th Foot Guards Regt
(3 battalions)
93rd Reserve Infantry
Regt (3 battalions)
+48th Infantry battalion from 228 Division (3 battalions)
2 x A7V sections
6 x field gun sections
Assets: Point Effect Barrage (8) Suppressive Barrage (10) Rolling
Barrage (5) Shock Assault (12)
Reserves may be called upon to exploit a breakthrough, but
this is not anticipated as being necessary.
_________________________________________________________________________________
The reserves in the case of the British were two Mark IVs and three Whippets. For the Germans I was going to recycle up to three battalions worth of casualties.
I didn't use the full SB set up process involving moving terrain and so on. I put out 4 objectives to encourage the German players to attack along historical lines, and hopefully give us the Savage Rabbits action on their left in the Bois d'Aquenne. To simulate the way the British held the front line I spread out battalions over two squares frontage and bolstered them with HMGs and a few mortars, as you can see. To simulate their recent occupancy of the area I classified their trenches as Hasty Defences. I also pushed them up to two squares from the German starting edge, to simulate the Germans getting really close due to heavy mist. The Germans also had an off table deployment area, rather than cram everything on the board.
Steve took the British, Richard and Phil took the Germans, with Phil on the right and Richard on the left.

Here's the German forces all lined up and ready to go.

The British wait in their defences, their attackers obscured by mist.

Not one to pass up an opportunity to attack, turn one and Phil is over the British defence line, his infantry leaving their armour support in their wake.

Steve launches an immediate counter attack...

.. but is bounced back by the elated Huns.

Phil has surged across the first line of defences and is heading off for Villers Bretonneux. He has despatched a battalion to deal with the remaining front line unit on the British left flank (he never deals with it throughout the game). Richard is up to the defences, and launches a double assault.

He is successful on the left, but held up by a gallant rearguard on his right.

Steve calls down a suppressive barrage to delay the attack (the German barrage rolls have been unmitigated failures up to this point). Luckily it doesn't stray, and drops a curtain of fire across the German line of attack.

The barrage is followed by a vigorous counterattack. Unable to retire because of the shelling behind them, Richard's forces take heavy casualties. Phil has less opposition, and is able to press on, out of shot at the top of the picture.

In his next turn Steve dropped a Point Barrage on the centre of the table, mainly frustrating Phil, who was desperately trying to avoid taking any morale tests if he could.

Alas the barrage was too much for some of his fellows, who turned tail and headed for the table edge.

At this point it looked like the German assault had stalled. Richard was back on his heels, and Phil's left had been forced back. However, Phil had now got his tank forwards, and was pressing on into Monument Wood, in front of V-B.

It was now time for the Germans to call in a suppressive barrage, which masked off the centre of Steve's second line whilst Phil assaulted objective 4, successfully.

Richard had now re-grouped and gone back on to the offensive.

For the first time the Germans had a tank in position, and drove it across the British defences, which collapsed.

From the resulting position it looked like Richard could roll up the rest of the British front line.

Phil was now firmly ensconced on objective 4, with the remains of a couple of British battalions hanging on to the table edge in front of them.
At this point we had to stop as chatting and me referring to rules I'm not really familiar with had slowed us down and it was getting on for midnight. It looked like the Germans were on top, but the Brits were holding on. The Game Countdown clock still had 6 points to go. We had a quick wash up and I explained what happened historically. Phil remarked that his Grandfather was with the Machine Gun Corps at the battle, which added some personal colour to the evening.
When I went out this afternoon to put everything away I decided to run through the next turn, as it was obvious what Phil & Richard were about to do.

I held on to objective 4, but launched assaults on the artillery next to them, and the Divisional HQ, now free from barrage smoke. These were both successful.The Germans now held all of V-B, except for one small toe hold in the corner.

Richard's troops were now able to start to roll up the front line, as anticipated.

The Germans now had a significant breakthrough on their left as well.

Time for the "Savage Rabbits", as Lt Mitchell and his tank force emerged onto the table to launch the counter attack.

Alas, tho', I threw a 6 for the countdown clock, and the game ended.
I totted up the Square Bashing victory points, as close as I could, and came up with a marginal British victory, which doesn't feel right. This was probably as the German left hadn't made enough progress, and the key rows and objectives were still mostly in the hands of 8th Division.
The players had said it played well. If I were to do it again I might look at a few things, and would certainly revisit the table layout. I did take some liberties, as you will be able to tell from the map below (half this sector was covered by 58th Div, but I shifted 8th Div across to cover it all as I had more info on them). In reality the Germans got all the way through VB, and made it to the table edge where Mitchell's tanks came on. It all looked very dicey for the Allies. Immediate counter attacks were ordered, but these were held off until nightfall, when the Australian counterattack went in and was completely successful. Most of the A7Vs were lost.

The Australian accounts stress the inexperience of the British troops, and say they were too keen to run away. That's easy to say when you've been moved out of the sector to a stronger position and not been attacked by tanks in positions you've only just occupied and have no anti-tank weapons. And 8th Division was weak, and held on remarkably well considering the odds stacked against them. The artillery men were notably brave, working their pieces despite being under heavy machine gun fire.
SB does have some issues. The ground scale / unit density isn't as scalable as I might like, and it is fairly broad brush in the way troops are represented. However, the constraints it imposes and the way it works does look like a WW1 Western Front battle, so I will persist with it. However, I have to say that even after all these years the rules are ramshackle, much as I love them and will continue to recommend them. There's no knowing where information might be, even tho' the rules have contents and an index. I hope I've done better than that with my latest set.
Thanks. I shall make a note of this to have a go at in due course. I don't have any A47s, so captured MKIVs it is.
ReplyDeleteDo you use house rules for splitting battalions across squares? My memory of SB is a bit sketchy.
Just split them across two squares. Have to be adjacent. Count as at strength until tak a hit.
Delete