After a brief excursion into the Middle Ages it's time to get back to more modern happenings with another playtest of "It's getting a bit Chile".
In the last couple of weeks I've been off around the country on business which gave me a bit of time to work on the missing areas of the rules. That means for this playtest we get officer characteristics, higher level formations and the effects of terrain on movement. As well as all of the other amendments that came out of the last playtest.
The Divisional level and above officers come with a card that looks like this:

It folds back on itself and for the moment goes in a playing card wallet. When I've finalised the details I'll laminate them.
 In addition to this I've been busy with the scenery. As I wrote in this blog My Favourite Things Part 1 one of the most useful things you can have as a Grownup Wargamer is a powered jigsaw, so I've been making more hills. I've also painted up a dozen Bend Sinister llamas and done some more pampas grass to break up the otherwise endless flatness of the Altiplano.
I had two players for this game, - Will & Phil. The two Chris' were off either pretending they had other friends in another part of the country (a likely story) or were supposedly unwell.
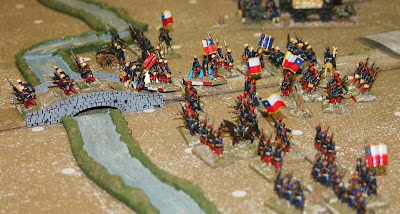
I set up an encounter battle with a Chilean force trying to seize a river crossing and an Allied force trying to stop them.

The Chileans are on the right, the Alliance on the left. Here's a picture of the Chilean General and his Army Reserve:

At the start of the game Will took the Chileans and I took the Bolivian/Peruvians. Will, eschewing the opportunity to test the new terrain rules, decided not to advance across the ridge line on his left and redeployed for a central thrust towards the bridge:

On his other flank I had set his troops up such that he had to advance down the hillside, affording me the chance to take this picture:

Funny how you suddenly notice how bent your flag poles are when you post a picture, isn't it?

In response I dragged the artillery from my left hand division up to the highest point I could in order to deny the river crossing. The new terrain rules give a number of squares movement deductions depending upon the terrain type. You can offset these deductions (which sometimes mean you can't move) by taking Disorder markers. As you can see in this picture I have rushed the guns up so I can get them into action, although possibly at reduced effect. I have sent the Divisional commander with them to help remove the Disorder for when I'm ready to fire them.

In the centre my Brave Bolivians pushed forwards. Their commander was hoping for a heroic showing here in order to bolster his Presidential ambitions.
Will, however, was not to be deterred and marched bravely towards the bridge.

You will note in later photographs that the bridge gets an upgrade as this one (a lovely Peter Pig resin model) is too narrow for the bases of my foot.
In previous rules players have been reluctant to use any form of March Column, despite them moving faster. In these rules I think I have fixed the problem by allowing them to be much more manoeuvrable and also letting them deploy into "looser" formations quickly. This may have over compensated, but it does mean that troops are moved to the point of conflict quicker and can, occasionally, get caught out whilst in column.

As you can see the mdf bridge from Warbases allows the figures to stand on it, which is good although I find the model itself less aesthetically pleasing than the Piggy version. Will has got his lead unit over the river and deployed into a firing line but he has suffered a little bit from fire from the guns deployed on the hill. By this point Phil has arrived and taken over the Allies, so everything that happens from now is not down to me.

On Will's right flank he got his troops up to the river and deployed into a firing line. He was worried about crossing the river and being caught disordered by Phil's infantry. However it did mean that a larger part of his army was effectively pinned in position by a smaller force.

In the centre Will continued to pour troops over the bridge.

Phil's Bolivians were able to concentrate their fire onto the troops guarding the bridge head and they broke, fleeing back across the river. His artillery continued to pound anything on the bridge itself. Will's guns are deployed off to the right, but as they're at ground level instead of on the heights their targets are limited.

A pause to take in the whole battlefield. Will has a lot of troops clustered round the bridge, but his unwillingness to cross the river elsewhere is creating a real bottleneck. Phil is bringing his right wing reserves forwards to threaten Will's cavalry who might pose a problem if they can cross the river.

Out on Will's right Phil is losing out in the firefight partly through poor dice rolling but also because Will outnumbers him. I think it is true to say this flank has bogged down until the firefight is decisively won. I think this favours Phil over Will in the overall game context.

Will has now got a lot of troops round the bridge. Both his left hand Division and the Reserve Division under the Army Commander are pressing forwards. We eagerly anticipate someone deploying a Gatling gun in range of a target.

Phil is able to close the range and open up with all of his lead units and he's got the Bolivian artillery deployed as well. You can see blue disorder markers starting to pop up on Will's units.

Talking of which Phil's left flank seems to be taking a real hammering. He is open order to reduce his casualty level but Will's rolling fire is taking a toll.

Sure enough Will's sustained fire breaks one of Phil's units who flee, causing some consternation amongst the llama population.

Will is taking similar punishment in the centre and can't bring his superiority in numbers to bear.
A heroic rearguard hold the bridge whilst Will retires and reorganises on his side of the river.

He has now shored up his position and is holding his side of the crossing. I should note at this point that he has actually managed to hit something with the Gatling gun, which is a major achievement.

This is the scene when we stopped after 2 1/2 hours of play. Will was convinced he couldn't make any progress, and that the game was a stalemate. Phil, however, had a different view. He felt that he had got Will trapped on the river line and that he would be able to turn Will's left flank, whilst holding his own.
So, thoughts. The commander abilities worked well, as did the terrain rules. The board with the river running across it gave me a game I wasn't expecting as the players took it as more of an obstacle than it actually was. Consequently the revisions to the charging/melee rules didn't get a run out.
It looks like the game is evolving nicely and I haven't broken the core system yet. I have some other notes on things that didn't work or I'd forgotten (eg what does a unit look like when it is rallied from rout) but nothing I'm worried about. Feeling very pleased and slightly smug.
In the last couple of weeks I've been off around the country on business which gave me a bit of time to work on the missing areas of the rules. That means for this playtest we get officer characteristics, higher level formations and the effects of terrain on movement. As well as all of the other amendments that came out of the last playtest.
The Divisional level and above officers come with a card that looks like this:

It folds back on itself and for the moment goes in a playing card wallet. When I've finalised the details I'll laminate them.

I had two players for this game, - Will & Phil. The two Chris' were off either pretending they had other friends in another part of the country (a likely story) or were supposedly unwell.
I set up an encounter battle with a Chilean force trying to seize a river crossing and an Allied force trying to stop them.

The Chileans are on the right, the Alliance on the left. Here's a picture of the Chilean General and his Army Reserve:

At the start of the game Will took the Chileans and I took the Bolivian/Peruvians. Will, eschewing the opportunity to test the new terrain rules, decided not to advance across the ridge line on his left and redeployed for a central thrust towards the bridge:

On his other flank I had set his troops up such that he had to advance down the hillside, affording me the chance to take this picture:

Funny how you suddenly notice how bent your flag poles are when you post a picture, isn't it?

In response I dragged the artillery from my left hand division up to the highest point I could in order to deny the river crossing. The new terrain rules give a number of squares movement deductions depending upon the terrain type. You can offset these deductions (which sometimes mean you can't move) by taking Disorder markers. As you can see in this picture I have rushed the guns up so I can get them into action, although possibly at reduced effect. I have sent the Divisional commander with them to help remove the Disorder for when I'm ready to fire them.

In the centre my Brave Bolivians pushed forwards. Their commander was hoping for a heroic showing here in order to bolster his Presidential ambitions.
Will, however, was not to be deterred and marched bravely towards the bridge.

You will note in later photographs that the bridge gets an upgrade as this one (a lovely Peter Pig resin model) is too narrow for the bases of my foot.
In previous rules players have been reluctant to use any form of March Column, despite them moving faster. In these rules I think I have fixed the problem by allowing them to be much more manoeuvrable and also letting them deploy into "looser" formations quickly. This may have over compensated, but it does mean that troops are moved to the point of conflict quicker and can, occasionally, get caught out whilst in column.

As you can see the mdf bridge from Warbases allows the figures to stand on it, which is good although I find the model itself less aesthetically pleasing than the Piggy version. Will has got his lead unit over the river and deployed into a firing line but he has suffered a little bit from fire from the guns deployed on the hill. By this point Phil has arrived and taken over the Allies, so everything that happens from now is not down to me.

On Will's right flank he got his troops up to the river and deployed into a firing line. He was worried about crossing the river and being caught disordered by Phil's infantry. However it did mean that a larger part of his army was effectively pinned in position by a smaller force.

In the centre Will continued to pour troops over the bridge.

Phil's Bolivians were able to concentrate their fire onto the troops guarding the bridge head and they broke, fleeing back across the river. His artillery continued to pound anything on the bridge itself. Will's guns are deployed off to the right, but as they're at ground level instead of on the heights their targets are limited.

A pause to take in the whole battlefield. Will has a lot of troops clustered round the bridge, but his unwillingness to cross the river elsewhere is creating a real bottleneck. Phil is bringing his right wing reserves forwards to threaten Will's cavalry who might pose a problem if they can cross the river.

Out on Will's right Phil is losing out in the firefight partly through poor dice rolling but also because Will outnumbers him. I think it is true to say this flank has bogged down until the firefight is decisively won. I think this favours Phil over Will in the overall game context.

Will has now got a lot of troops round the bridge. Both his left hand Division and the Reserve Division under the Army Commander are pressing forwards. We eagerly anticipate someone deploying a Gatling gun in range of a target.

Phil is able to close the range and open up with all of his lead units and he's got the Bolivian artillery deployed as well. You can see blue disorder markers starting to pop up on Will's units.

Talking of which Phil's left flank seems to be taking a real hammering. He is open order to reduce his casualty level but Will's rolling fire is taking a toll.

Sure enough Will's sustained fire breaks one of Phil's units who flee, causing some consternation amongst the llama population.

Will is taking similar punishment in the centre and can't bring his superiority in numbers to bear.

A heroic rearguard hold the bridge whilst Will retires and reorganises on his side of the river.

He has now shored up his position and is holding his side of the crossing. I should note at this point that he has actually managed to hit something with the Gatling gun, which is a major achievement.

This is the scene when we stopped after 2 1/2 hours of play. Will was convinced he couldn't make any progress, and that the game was a stalemate. Phil, however, had a different view. He felt that he had got Will trapped on the river line and that he would be able to turn Will's left flank, whilst holding his own.
So, thoughts. The commander abilities worked well, as did the terrain rules. The board with the river running across it gave me a game I wasn't expecting as the players took it as more of an obstacle than it actually was. Consequently the revisions to the charging/melee rules didn't get a run out.
It looks like the game is evolving nicely and I haven't broken the core system yet. I have some other notes on things that didn't work or I'd forgotten (eg what does a unit look like when it is rallied from rout) but nothing I'm worried about. Feeling very pleased and slightly smug.
The battle is evolving nicely! Looking forward to Part 2.
ReplyDeleteAlas I stopped it there and put the toys away. I have learned what I needed from the game so I'll reset for next week.
DeleteIt is amazing how terrain can scare wargamers. I've been in that situation before - and lining up on a river bank without even trying to cross is pretty common.
ReplyDeleteUnless in defensive positions, how often did melee occur? Maybe the next game could feature an advanced defensive line based around a village. That should ensure the melee rules get a decent go.
It is also interesting in that it shows you that defending a river line actually hands the initiative to your opponent.
DeleteA lot of battles in this war are defend/attack. The prevalence of defended adobe walls and death or glory bayonet charges is quite high.
Hi Trebian,
ReplyDeleteI, too, am interested in the Pacific War. Your rules sound interesting. If you need a playtester, I would like to help you out.
John
Thanks. Let me have your email address and I'll send you a copy. I'm on TMP if you want to use their Personal Messaging service so you don't have to put up your address publicly.
DeleteHello, really like your photos, any chance of getting 5-6 photos on a page so mi can print off the pages ? Pat.
ReplyDeleteIf you right click the pictures you can save down the ones you want. If you are going to use them other than for personal use, please give me & the blog a credit.
DeleteHi there, tried clicking , nothing happens, never mind, do you have any close up shots of your 1879 figures , front and rear views ? Pat.
ReplyDeleteYou probably have issues with your internet browser setting.
DeleteAnyhow, give me your email address and I'll take some just for you.