First Monday Night Game of the year, and we're off to Bosworth with Richard's "Battle Commander" rules. (NB He's not the Rotten Richard of the title, if you were wondering).
I took the role of Richard III, and Jon put his hand up to be Henry Tudor. Prior to the game the umpire asked us both to take some decisions. I replicated RIII's orders to execute Lord Strange (and saw to it that it got done right and proper) but declined to deploy him with a mounted retinue. Honestly, has no one learned anything from the Wars of the Roses? Mounted units achieve next to nothing in this period in England.
I assume that Jon was given some options to chose from as well at the start.
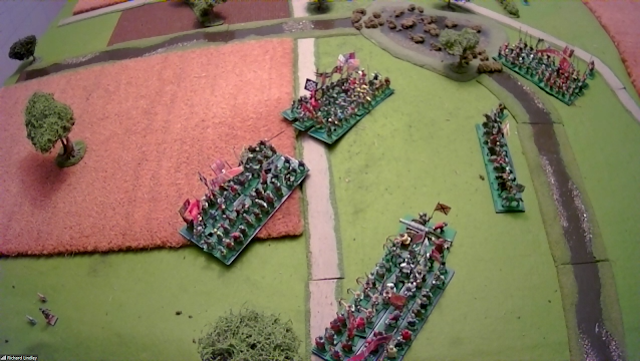
Here we are with a view of the battlefield, more or less looking East. Ambion Hill is top left, and the village of Daddington is top right. My army is marching in column on the left, aiming to strike swiftly at the Welsh usurper. At the front of the column is Norfolk controlled by Steve. I'm right behind him, and Northumberland is sitting on Ambion Hill. In Daddington you can just see Lord Stanley's forces, and the very edge of William Stanley's battle is peeping out on the right. At the bottom you can see Henry Tudor with his retinue, mounted (???)
A different shot shows the rest of the Tudor forces just on the edge of the battlefield. The tree is on the top of a rise, obscuring the view. My army, apart from Northumberland, is pressing forwards. You can see my artillery heading off to deploy in a field in the centre of the table.
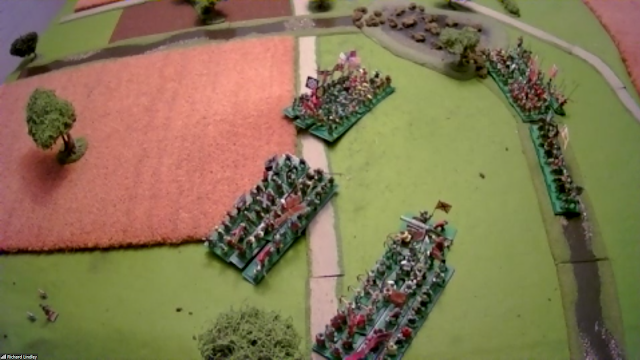
Here's a better shot of the Tudor deployment. The Stanleys are stationary.
Steve deploys into battle formation, and one of my artillery pieces heads into the field. Another gun is in the distance, and will join up with it in due course.
I deploy into battle formation, and Will, in charge of William Stanley, moves off from the hill he was sat on. Steve, and Ian in charge of Henry's foot troops, exchange volleys of arrows. Much to my surprise he seems to have a stronger unit, with more effective archers.
I pull up my troops in line with Steve's. My artillery opens up on Jon's cavalry, and inflicts some hits. William Stanley moves closer, and I'm not sure on the distances as to whether we'll get where I want to be in time.
Steve and Ian are shooting at each other, and Steve is losing out. The Tudor forces seem to be stronger than the Yorkists in terms of archery, which immediately surprised me, and their battles looked stronger too, another surprise. Messengers start to cross back and forth between Henry and William.
Nothing for it, but to close with the Tudors forces, into the teeth of the artillery and Ian's archery, which continues to be very effective.
Our artillery continues to blow lumps out of the Tudor horse. Jon pulls them back, trying to get out of shot.
Ian and Steve close on each other, and get stuck in. I swing round to face Will, scaring off the Tudor gun crew into the bargain.
Will charges in, as Ian throws Steve's men back. (BTW out of shot Lord Stanley has marched out of Daddington and is heading towards the fighting. Northumberland continues to sit on Ambion Hill).
Oh No! The Tudor secret weapon, French and Burgundian mercenaries, emerges from ambush.
My battle aligns with Will, and we climb in with everything we have. I need to knock him backwards and out of it quickly. My guns are playing on the rear of his unit to variable effect.
There now follows a confusing bit of umpire catch up. Richard our host isn't that well, and he forgot to check the morale status of the Tudor horse. He concludes that they probably should have run away, but rules that if Jon had known that, he'd have taken action to bolster morale. This is allowed retrospectively, holding them in place, and they avoid the downside consequences by some poor dice rolling by me. Under further pressure, Jon has to give them a rousing speech to restore them to fighting trim. This fails, and they flee...
Luckily for Jon this doesn't cause any serious adverse effects on the rest of the army.
As Henry gallops back across the stream, the French pike pile into the flank of my battle. I'd previously failed to inflict many hits in the last two melee rounds, and got wounded as well. Steve is taking a pounding but clinging on just about. With Lord Stanley heading down the road into our rear, the game is up, and it's a Tudor win.
An interesting game, but it looked to me that once that once I'd messed up the dice roll on the execution of Lord Strange it all became a little inevitable. With the relative strengths of the armies I needed to engage and defeat the forces with Henry Tudor before William Stanley got closely engaged, and I also needed Northumberland to cover the rear. Neither of these happened. The decision not to mount up still looks like a good one. If things had gone better the extra dice he brought to the main battle should have tipped the balance.
I wonder if we'd been better off just sitting at the bottom of Ambion Hill.


Before dismissing Henry's decision to keep his cavalry mounted as preposterous, one ought to consider all of the possibilities.
ReplyDeleteHenry could win a marginal victory by simply moving off table in the direction of William Stanley. Since Henry had no ideas on the lay of the land, the Yorkist positions, his own dispositions, and the fidelity of the Stanleys, remaining mounted seemed a viable option to make a quick exit, Stage Right, if needed. Throughout the battle, I really never grasped the lay of the land. I figured if the Tudor artillery could not see anything, it would be unlikely that anything could see the Tudor horse positioned immediately upon the guns' right. Wrong! The terrain topography still confuses me.
We both had interesting, pre-game decisions to make. The way in which the game was presented and the narrative Richard wove, this would have made an interesting Matrix game.
I did not comment on your decision to fight mounted, more of a reflection on Richard's historic action. Ricardians claim him as a great commander, only beaten by traitors. In practice he was a poor CinC. I assume you had a plan for using the mounted force, but that we confounded it. We still lost, however.
DeleteI love it when I get to see both sides of a fight, covered on different blogs ;) Be interesting to see if you got similar results if played again.
ReplyDeleteIt is interesting to see what the other person was thinking at the time. If we played again I might try a thing or two differently, but the basic strategy was sound, except 0erhaps for the execution.
DeleteWhat did you make of the 'Battle Commander' rules?
ReplyDeleteWhen I say "Battle Commander" I mean a homegrown set, written by one of our group. They are a pretty decent model of WotR combat, and can give a very tense game. They focus heavily on what commanders can do. I think Richard hasn't got the calibration of unit factors/values exactly right yet, but he's pretty close.
DeleteIndeed, it is interesting to observe one event from different points of view. The War of the Roses is a very beautiful historical period!
ReplyDeleteLots of nice banners and shiny armour for sure!
DeleteI guess I don't get a couple things about executing Lord Strange. How did you mess it up as you stated you did? And still unsure of why execute him at all - did not that pretty much guarantee that Stanley would then want revenge and fight for Henry?
ReplyDeleteI thought long about what to do with Lord Strange. I nearly let him go. Historically, RIII ordered his execution because he could see that the Stanleys were not going to back him. However, the execution never actually happened, and the Stanleys got stuck in anyway. The issue in the game was the two dice rolls I made. If I've got this right - we didn't see the scenario notes - I rolled a 6 first, which meant Strange was definitely dead, overseen by Catesby. Then I rolled a 1, which meant the news got out immediately AND the Duke of Northumberland really took against it as an action. The other way round and rolling a 1,6 Strange would have lived, the Stanleys might have gone home and Northumberland would have come down from his hill top position.
DeleteMy view on Bosworth is that RIII was almost certainly going to lose. Henry & the Stanleys had lured him into an unfavourable position, having concentrated their forces. Northumberland, as a Percy, was more pro-Lancaster than pro-Yorkist and Richard had done his best to hack off most of the senior nobility anyway. His best and only chance was to strike very fast and hard at Henry Tudor's force and overwhelm it before anyone else could intervene.
Beautiful game and terrain.
ReplyDeleteI can claim no credit for any of the set up. Many of the figures are old Minifigs and benefit from being on a slightly fuzzy camera.
Delete